

We’ve all dreamt of golden, crispy Caramel Apple Hand Pies, only to face the disappointment of a burst seam. I’ve perfected a method that banishes those sticky spills, ensuring every single hand pie emerges beautifully sealed and wonderfully crisp. Get ready to enjoy this classic dessert without a single worry, serving up pure apple caramel bliss.
Why This Caramel Apple Hand Pie Recipe is a Game-Changer
Banish Bursting Pies: Our Leak-Proof Secret Revealed
The secret to a flawless hand pie lies in the details. We ensure the apple filling is completely cooled, eliminating steam that causes bursts. A simple trick of moistening edges, followed by a firm fork crimp, creates an unbreakable seal.
Effortless Enjoyment: Convenience Meets Gourmet Flavor
Using convenient refrigerated pie crusts saves time without sacrificing quality. This recipe streamlines the process, making gourmet-tasting treats accessible to everyone. You’ll be surprised how quickly these delightful treats come together.
The Perfect Portable Treat for Any Occasion
These delightful hand pies are ideal for picnics, lunchboxes, or a quick sweet escape. Their compact size makes them perfectly portable and mess-free to enjoy anywhere. They’re a crowd-pleaser for any gathering.
The Essential Ingredients for Irresistible Hand Pies
For the Caramel Apple Filling: Sweet, Tender, & Thick
Opt for firm, crisp apples like Honeycrisp or Granny Smith; their texture holds up beautifully, offering a pleasant tart-sweet contrast. Ground cinnamon and unsalted butter infuse the diced apples with warm, comforting notes as they gently cook down.
The cornstarch slurry is your thickening hero, ensuring the apple filling is rich and clingy, not watery. This prevents any thin spots that could lead to a leaky pie during frying.

The Foundation: Store-Bought Pie Crusts for Convenience
Refrigerated pie crusts are a fantastic shortcut, providing a consistently flaky base without the fuss of homemade dough. A light flouring of your work surface prevents sticking, making them easy to handle and shape.
Finishing Touches: Drizzle & Dust
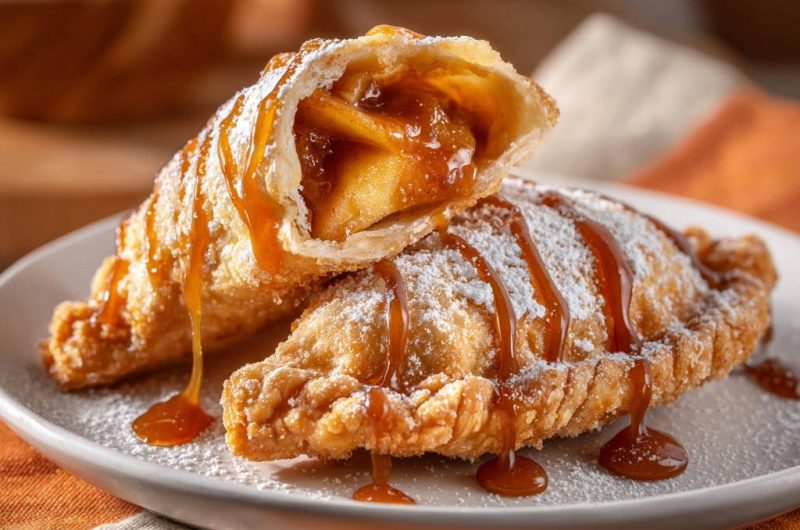
A generous dusting of powdered sugar adds a delicate sweetness and appealing finish to each hand pie. Finally, a luscious drizzle of caramel sauce elevates these into truly decadent Caramel Apple Hand Pies.
Gear Up: Must-Have Tools for Hand Pie Success
Kitchen Essentials for Precise Prep
To ensure precise measurements and easy handling, you’ll need:
Measuring Spoons & Cups: For accurate ingredient ratios, especially for the crucial cornstarch slurry that thickens your filling.
Mixing Bowls: Essential for combining your apple filling ingredients and preparing the slurry.
Rolling Pin: To gently unroll and, if needed, re-roll pie crust scraps smoothly without tearing.
4-5 Inch Round Cutter: A large drinking glass works perfectly too, creating uniform pie circles for professional-looking treats.
Frying Fundamentals: Achieving Golden Perfection
For perfectly golden and crispy results, gather these:
Large, Heavy-Bottomed Pot or Dutch Oven: Provides stable, even heat distribution, crucial for consistent frying and preventing temperature fluctuations.
Slotted Spoon: For safely removing your hand pies from the hot oil and allowing excess oil to drain away quickly.
Wire Rack & Paper Towels: Essential for draining oil and maintaining crispness after frying, preventing soggy bottoms by allowing air circulation.
Kitchen Thermometer (Optional but Recommended): For precise oil temperature control, ensuring optimal frying without guesswork for consistently perfect results.
Your Path to Perfect Caramel Apple Hand Pies: A Detailed Guide
Step 1: Crafting the Silky-Smooth Apple Filling
In a medium saucepan, combine the diced apples, granulated sugar, cinnamon, and butter. Cook over medium heat, stirring occasionally, until apples are tender but still hold their shape, about 5 to 7 minutes. They should be softened but not mushy.
In a small bowl, whisk together the cornstarch and water to create a smooth slurry. Add this slurry to the apples and stir constantly for 1 minute until the mixture thickens beautifully. This cornstarch is key for a stable, leak-proof filling that won’t run out during frying.
Remove from heat and immediately transfer the filling to a plate or shallow bowl, spreading it out. Allow it to cool completely to room temperature. This step is crucial for preventing steam build-up and leaks during frying, ensuring your Caramel Apple Hand Pies don’t burst open.
Step 2: Preparing Your Pie Crust Circles
Unroll the refrigerated pie crusts onto a lightly floured surface. Using a 4 to 5 inch round cutter (or a large drinking glass), cut out as many circles as possible from each crust. You should get about 4 to 5 circles per crust.
Gather and gently re-roll any scraps if desired, to cut a few more circles. Work quickly to keep the dough cool and easy to manage, minimizing handling to maintain flakiness.
Step 3: The Leak-Proof Assembly Method (Crucial Steps!)
For each pie circle, place a heaping tablespoon of the completely cooled apple filling onto one half of the circle, leaving a clear 1/2 inch border around the edge. Remember, do not overfill; less is more for a secure seal.
Lightly moisten the entire edge of the circle with a little water using your fingertip or a pastry brush. This creates a strong adhesive, vital for preventing bursts and ensuring a perfectly sealed hand pie.
Carefully fold the empty half of the dough over the filling to meet the moistened edge. Gently press the edges together with your fingers to seal, ensuring no air is trapped inside. Air pockets can lead to blowouts when frying!
Then, use the tines of a fork to firmly crimp the edges all around. This creates a beautiful decorative seal that also locks in the filling, providing an extra layer of protection against leaks. Repeat with remaining dough circles and filling.
Step 4: Achieving Golden Crispiness: Frying Your Hand Pies
In a large, heavy-bottomed pot or Dutch oven, pour enough vegetable oil to reach about 2 to 3 inches deep. Heat the oil over medium heat until it reaches 350 degrees Fahrenheit. If you don’t have a thermometer, a small piece of dough should sizzle and float to the top immediately, indicating it’s ready.
Carefully lower 2 to 3 hand pies into the hot oil, being careful not to overcrowd the pot. Overcrowding dramatically drops the oil temperature, leading to greasy, less crispy results.
Fry for 2 to 3 minutes per side, or until golden brown and crispy. Use your slotted spoon to gently flip them halfway through cooking.
Using a slotted spoon, carefully remove the fried hand pies and place them immediately on a wire rack set over a baking sheet lined with paper towels to drain excess oil. This ensures maximum crispiness and prevents them from becoming greasy.
Step 5: The Grand Finale: Dusting & Drizzling
Once slightly cooled, dust the hand pies generously with powdered sugar. The residual warmth helps the sugar adhere beautifully, creating a delicate sweet coating.
Drizzle with caramel sauce just before serving. For homemade caramel that’s truly exceptional, consider trying our recipe for silky smooth caramel sauce to elevate these treats even further. Enjoy your perfectly sealed, crispy treats!
Chef’s Secrets: Elevate Your Caramel Apple Hand Pie Game
The Importance of a Completely Cooled Filling
Ensure your apple filling is completely cooled before assembling. Warm filling creates steam, which expands rapidly during frying and can cause pies to burst open, ruining your perfect Caramel Apple Hand Pies. Patience here pays off immensely.
Mastering the Seal: Tips for No-Leak Frying
Don’t skip moistening the edges and firmly crimping with a fork. A tight, secure seal is your best defense against leaks, keeping all that delicious filling locked inside for a mess-free experience.
Temperature Control: Your Frying Success Factor
Maintain the oil temperature consistently around 350°F (175°C). Too low, and pies absorb excess oil, becoming greasy; too high, and they burn on the outside before the dough is cooked through. A thermometer is your best friend here.
Don’t Overcrowd the Pot: For Even Cooking
Always fry hand pies in small batches, typically 2-3 at a time. Overcrowding dramatically lowers the oil temperature and leads to uneven cooking, preventing that desirable golden crispiness and even browning.
Customize Your Hand Pies: Flavor Variations
Experiment with adding a pinch of freshly grated nutmeg or a tiny dash of allspice to the apple filling for extra warmth and complexity. You can also explore different fruit fillings like peaches or berries, ensuring they are also properly thickened to prevent sogginess.
For another delightful hand pie experience, you might enjoy our perfect blueberry hand pies, which also feature a no-leak method for success.
Troubleshooting Your Hand Pies: Common Questions, Simple Solutions
Why Did My Hand Pies Burst During Frying?
This common issue is usually due to a filling that wasn’t fully cooled, overfilling the dough circles, or an insufficient seal around the edges. Always ensure the filling reaches room temperature and thoroughly crimp the edges with a fork to create a robust seal.
My Filling Is Too Runny/Hard – What Went Wrong?
If the filling is too runny, you might need a bit more cornstarch slurry, or the apples weren’t cooked down sufficiently. If it’s too hard, the apples were likely overcooked, or the cornstarch ratio was too high. Adjust these elements slightly in your next batch for perfect consistency.
Hand Pies Aren’t Getting Golden Brown?
This indicates your oil temperature is likely too low. Ensure your oil reaches the recommended 350°F (175°C) before adding the hand pies and maintain that temperature throughout the frying process for a beautiful golden hue and crisp texture.
Dough is Too Sticky or Crumbly?
If the dough is too sticky, lightly flour your work surface and hands more generously as you work. If it’s crumbly, the dough might be too cold or dry; let it sit at room temperature for a few minutes before working with it, which will make it more pliable.
Caramel Apple Hand Pie FAQs: Your Questions Answered
Can I Bake These Hand Pies Instead of Frying?
Yes, you can! For a delicious baked version, preheat your oven to 375°F (190°C). Place the assembled hand pies on a baking sheet lined with parchment paper, and for a beautiful golden finish, you can brush them with an egg wash.
Bake for 18-22 minutes, or until they achieve a lovely golden brown color. While frying offers peak crispness, baking provides a lighter alternative that’s still incredibly flavorful.
How Long Do Caramel Apple Hand Pies Last?
These hand pies are undeniably best enjoyed fresh for maximum crispiness and warmth. However, you can store them in an airtight container at room temperature for up to 2 days, or in the refrigerator for up to 4 days.
For best results, reheat them gently in a toaster oven or air fryer to restore some of their delightful crispiness and warmth before serving.
Can I Prepare the Filling Ahead of Time?
Absolutely! The delicious apple filling can be made up to 2-3 days in advance. Store it in an airtight container in the refrigerator to save time on busy days.
Just remember the crucial step: ensure it’s completely cooled to room temperature before you begin assembling your hand pies to prevent any bursting during frying. This is key for success.
What Kind of Apples Work Best?
Honeycrisp or Granny Smith apples are highly recommended for this recipe. They are firm enough to hold their shape during cooking, providing a pleasant texture contrast to the soft filling.
Additionally, their balanced sweetness and tartness perfectly complement the rich caramel and warm cinnamon flavors, making for truly outstanding apple hand pies every time.
Are These Freezer-Friendly?
Yes, these hand pies are freezer-friendly before frying! Place the assembled, un-fried hand pies on a baking sheet and freeze them until they are completely solid. This prevents them from sticking together.
Once frozen, transfer them to a freezer-safe bag or container, where they can be stored for up to 1 month. When ready to enjoy, you can fry them directly from frozen, adding a few extra minutes to the cooking time until golden and cooked through.
Serving & Storing Your Delicious Hand Pies
The Best Ways to Enjoy Your Warm Treats
These Caramel Apple Hand Pies are simply irresistible when served warm, ideally fresh out of the fryer. A generous dusting of powdered sugar and a luscious drizzle of extra caramel sauce are non-negotiable for the ultimate experience.
For an even more indulgent dessert, pair them with a scoop of creamy vanilla bean ice cream or a cloud of freshly whipped cream. The warm, crispy pie with cold ice cream is pure bliss, creating a delightful contrast of temperatures and textures.
Keeping Them Fresh: Storage Tips
To maintain their delightful crispiness, store any leftover hand pies in an airtight container at room temperature for up to 2 days. For extended freshness, they can be refrigerated for up to 4 days.
Avoid stacking them directly on top of each other if possible, as this can cause them to stick and lose their texture. Reheat gently in a toaster oven or conventional oven to bring back their crisp exterior and warm filling, avoiding the microwave for best results.
Ready to Impress? Share Your Caramel Apple Hand Pie Masterpiece!
Now that you’ve mastered the art of the perfectly sealed, crispy Caramel Apple Hand Pie, it’s time to share your culinary triumph! Whether you’re whipping up a batch for a special gathering, a cozy night in, or simply to satisfy a sweet craving, these delightful treats are sure to bring smiles.
We’d love to see your creations! Share your beautiful apple treats on social media and tag us. Happy baking (and frying)!
Caramel Apple Hand Pies
Course: DessertCuisine: American CuisineDifficulty: easy4
8-10 hand pies45
minutes25
minutes120
minutesAmerican Cuisine
Ingredients
2 medium apples, such as Honeycrisp or Granny Smith, peeled, cored, and diced small
2 tablespoons granulated sugar
1/2 teaspoon ground cinnamon
1 tablespoon unsalted butter
1 teaspoon cornstarch
1 tablespoon water
1 package (14.1 ounces) refrigerated pie crusts (2 crusts)
Vegetable oil, for frying
1/4 cup powdered sugar, for dusting
2 tablespoons caramel sauce, for drizzling
Directions
- Prepare the Apple Filling: In a medium saucepan, combine the diced apples, granulated sugar, cinnamon, and butter. Cook over medium heat, stirring occasionally, until apples are tender but still hold their shape, about 5 to 7 minutes. In a small bowl, whisk together the cornstarch and water to create a slurry. Add the slurry to the apples and stir constantly for 1 minute until the mixture thickens. Remove from heat and transfer the filling to a plate or shallow bowl. Spread it out and allow it to cool completely to room temperature. This step is crucial for preventing steam build-up and leaks during frying.
- Cut the Pie Crusts: Unroll the refrigerated pie crusts onto a lightly floured surface. Using a 4 to 5 inch round cutter (or a large drinking glass), cut out as many circles as possible from each crust. You should get about 4 to 5 circles per crust. Gather and re-roll scraps if desired, to cut more circles.
- Assemble the Hand Pies (The Leak-Proof Method): For each pie circle, place a heaping tablespoon of the cooled apple filling onto one half of the circle, leaving a clear 1/2 inch border around the edge. Do not overfill. Lightly moisten the entire edge of the circle with a little water using your fingertip or a pastry brush. This creates a strong adhesive.
- Carefully fold the empty half of the dough over the filling to meet the moistened edge. Gently press the edges together with your fingers to seal, ensuring no air is trapped inside. Then, use the tines of a fork to firmly crimp the edges all around, creating a decorative seal that also locks in the filling. Repeat with remaining dough circles and filling.
- Fry the Hand Pies: In a large, heavy-bottomed pot or Dutch oven, pour enough vegetable oil to reach about 2 to 3 inches deep. Heat the oil over medium heat until it reaches 350 degrees Fahrenheit. If you don’t have a thermometer, a small piece of dough should sizzle and float to the top immediately.
- Carefully lower 2 to 3 hand pies into the hot oil, being careful not to overcrowd the pot. Fry for 2 to 3 minutes per side, or until golden brown and crispy.
- Using a slotted spoon, carefully remove the fried hand pies and place them on a wire rack set over a baking sheet lined with paper towels to drain excess oil.
- Finish and Serve: Once slightly cooled, dust the hand pies generously with powdered sugar. Drizzle with caramel sauce just before serving. Enjoy your perfectly sealed, crispy treats!
Notes
- Ensure apple filling is completely cool before assembling to prevent steam build-up and leaks during frying. This step is crucial.


