We’ve all been there: dreaming of that perfect bite of a warm apple pie, especially when it promises a river of gooey caramel. The challenge, however, often lies in achieving that luscious, flowing caramel without it becoming a sticky, unmanageable mess inside your `Apple Hand Pies`. After countless attempts, I finally unlocked the secret to consistently delivering these irresistible handheld delights, each one bursting with truly divine, perfectly gooey caramel.
Beyond Basic: The Secret to Our Dreamy Caramel Apple Hand Pies
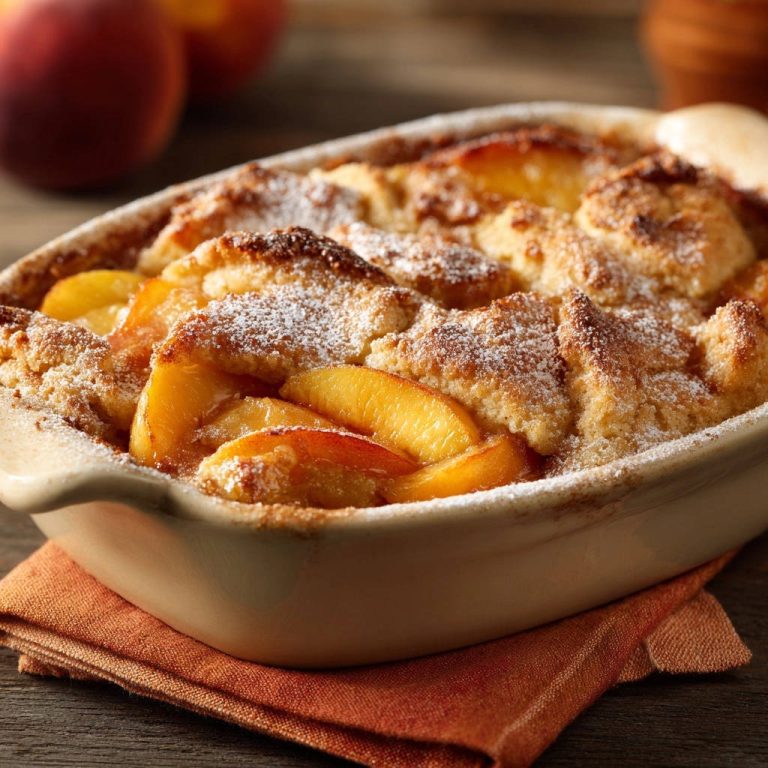
The Magic of “Gooey Caramel Perfection”
This recipe isn’t just about combining apples and caramel; it’s about mastering the caramel itself. We’ll show you a precise technique and ingredient ratio that guarantees a rich, luscious, and most importantly, gooey caramel that flows beautifully without making your pies soggy.
Say goodbye to overly firm or watery fillings. This method ensures that delightful caramel pulls and stretches with every bite, creating an unforgettable experience.
Bite-Sized Bliss: Convenience Meets Incredible Flavor
There’s something uniquely charming about a hand pie. These individual portions mean no slicing, no plates, and definitely no mess, making them ideal for on-the-go enjoyment or effortless entertaining.
Despite their convenient size, these `Apple Hand Pies` pack all the comforting flavor of a full-sized apple pie, elevated by that incredible caramel center. If you love delightful fruit pastries, you might also enjoy our recipe for perfect blueberry hand pies, offering a different but equally satisfying fruit experience.
Simple Steps, Impressive Results: Even for Beginners
Don’t let the idea of homemade caramel intimidate you. Our step-by-step guide is designed to be straightforward and accessible, even if you’re new to baking.

Utilizing pre-made pie crusts simplifies the process significantly, allowing you to focus on the magic of the filling. You’ll achieve impressive bakery-quality results with minimal fuss.
Gather Your Goodness: Key Ingredients for Apple Hand Pies
The Star Fruit: Choosing the Perfect Apples
For the best `Apple Hand Pies`, we recommend Gala or Honeycrisp apples. Their inherent sweetness and crisp texture hold up wonderfully during baking, preventing a mushy filling.
These varieties offer a beautiful balance of sweet and slightly tart notes, which complements the rich caramel perfectly.
Crafting the Caramel: Sugar, Cream, and Butter Essentials
Light brown sugar is essential for a deep, molasses-rich caramel flavor. Heavy cream adds luxurious richness and contributes to that signature gooey texture, preventing the sugar from crystalizing.
Unsalted butter provides a silky base and adds depth, while a tiny pinch of salt balances the sweetness, enhancing all the flavors. This caramel technique is so versatile, you can even use it for other treats like salted caramel chocolate squares.
Flaky Foundations: Pre-Made vs. Homemade Pie Crusts
Pre-made pie crusts are a fantastic shortcut, delivering a reliably flaky result with minimal effort. Ensure they are cold when you begin to maintain their structure.
If you prefer, homemade pie dough offers an extra layer of freshness and flavor, but store-bought works wonderfully and keeps this recipe quick and easy.
Flavor Boosters: Spices, Lemon, and Egg Wash
Fresh lemon juice isn’t just for preventing apples from browning; it brightens the apple flavor, providing a welcome counterpoint to the sweetness. Ground cinnamon and nutmeg infuse the filling with classic warm, comforting notes.
Finally, a beaten egg acts as a “glue” for sealing the pies and provides a beautiful golden-brown sheen when brushed on the crust. A sprinkle of extra granulated sugar adds a delightful crunch and sparkle.
Your Kitchen Arsenal: Essential Tools for Hand Pie Success
Having the right tools makes the baking process smoother and more enjoyable.
Mixing Bowls: A medium bowl for your apple mixture and a small saucepan for crafting the caramel.
Measuring Tools: Standard measuring cups and spoons are essential for precise ingredient amounts, critical for perfect caramel.
Baking Sheets and Cutters: You’ll need at least one large baking sheet, lined with parchment paper, and a 4 to 5-inch round cutter for shaping your hand pies.
Baking Brilliance: Crafting Your Caramel Apple Hand Pies
- Preparing the Apple Filling: A Flavorful Start
In a medium bowl, combine the diced apples with lemon juice, 1/4 cup granulated sugar, cinnamon, nutmeg, and the flour or cornstarch.
Toss gently to coat, ensuring all apples are evenly seasoned and coated with the thickener. This ensures the filling isn’t too runny and holds its shape within the pie.
- The Caramel Conundrum Solved: Achieving That Perfect Gooey Texture
In a small saucepan over medium heat, melt the butter. Add the brown sugar and a pinch of salt.
Stir continuously until the sugar is dissolved and the mixture begins to bubble, about 2 minutes. This initial stirring is crucial for a smooth base and prevents the sugar from burning.
Pour in the heavy cream and stir well. The mixture will thicken. Continue to cook and stir for another 1 minute, ensuring it is smooth and luscious. Remove from heat.
This precise ratio and cooking time for the caramel with the cream is key to its perfect gooey texture later, guaranteeing a flowing consistency.
- Combining the Stars: Apples Meet Caramel Bliss
Add the prepared apples to the warm caramel sauce, stirring gently to combine.
Ensure the apples are fully coated with the rich caramel, preparing them for baking and infusing every piece with flavor.
- Preheating and Preparing Your Baking Surface
Preheat your oven to 400 degrees Fahrenheit (200 degrees Celsius). Line a baking sheet with parchment paper.
Parchment paper prevents sticking, makes cleanup a breeze, and ensures an even bake on the bottom crust.
- Rolling and Cutting: Shaping Your Hand Pies
On a lightly floured surface, roll out one pie crust. Using a 4 to 5 inch round cutter, cut out as many circles as possible.
Gather and reroll scraps as needed, but avoid overworking the dough to keep it tender and flaky. Repeat with the second pie crust.
- Assembling the Treats: Filling, Sealing, and Crimping
Spoon about 2 tablespoons of the apple caramel filling onto one half of each pie crust circle, leaving a small border around the edge.
Brush the edges of the crust with a little of the beaten egg. This acts as a ‘glue’ to help seal the pies and prevents leaks during baking.
Fold the other half of the pie crust over the filling to create a half moon shape. Press the edges firmly to seal, then crimp with a fork for a decorative and secure edge.
- The Finishing Touches: Egg Wash, Sugar, and Vents
Place the sealed hand pies on the prepared baking sheet. Brush the tops of the hand pies with the remaining beaten egg and sprinkle generously with extra granulated sugar.
The egg wash gives a beautiful golden sheen, and the sugar adds a delightful crunch and sparkle to the finished crust.
Cut a few small slits in the top of each hand pie to allow steam to escape, preventing them from bursting and ensuring an even bake.
- Baking to Golden Perfection
Bake for 18 to 22 minutes, or until the crust is golden brown and the filling is bubbling.
Keep an eye on them towards the end of the baking time, as oven temperatures can vary. A deeply golden crust indicates perfect doneness.
- Cooling for Optimal Gooeyness
Let cool on the baking sheet for at least 10 minutes before serving.
This cooling time is crucial for the caramel to set into its perfect gooey, flowing consistency, preventing it from being too runny and ensuring a pleasant eating experience.
Chef’s Secrets: Elevate Your Apple Hand Pie Experience
Don’t Rush the Caramel: Patience is Key. Ensure the brown sugar is fully dissolved and the cream is incorporated smoothly during the caramel-making process for the best texture. This prevents a grainy caramel.
Preventing Soggy Bottoms: The Flour/Cornstarch Advantage. The flour or cornstarch in the apple filling isn’t just for coating; it helps absorb excess moisture released by the apples, preventing a soggy crust and ensuring a firm filling.
Achieving That Perfect Golden Crust. A generous egg wash and sprinkle of granulated sugar before baking are essential for a beautiful, golden-brown, and slightly crunchy finish that is visually appealing and adds texture.
Spice It Up: Customizing Your Apple Filling. While cinnamon and nutmeg are classics, consider a pinch of allspice or ginger for an extra layer of warmth, or a tiny dash of vanilla extract for added complexity. Experiment to find your favorite blend.
Chilling Dough for Easier Handling. If using homemade pie crusts or if your store-bought dough gets too warm, a quick chill in the fridge will make it easier to roll, cut, and handle, leading to a more tender and flaky crust.
Solving Hand Pie Hurdles: Common Questions & Quick Fixes
“My Caramel Isn’t Gooey Enough!”
This often happens if the caramel wasn’t cooked long enough after adding the cream, or if the ratio of cream to sugar was off. Ensure you cook it until it noticeably thickens, stirring consistently, and always use heavy cream for the best results.
“My Hand Pies are Leaking!”
Leaking usually indicates the edges weren’t sealed properly or the filling was too close to the edge. Make sure to press firmly with your fingers and crimp well with a fork, leaving a clear border around the filling.
Also, cutting slits on top allows steam to escape, reducing internal pressure that can cause leaks. Don’t skip this crucial step!
“The Crust Isn’t Flaky!”
Overworking the pie dough can lead to a tough, rather than flaky, crust. Handle the dough as little as possible. Ensure your butter (if homemade) or store-bought crust is kept cold, as cold fat is key to creating those desirable flaky layers.
Enjoying & Preserving Your Delicious Apple Hand Pies
Serving Suggestions: The Perfect Accompaniments
These warm `Apple Hand Pies` are delightful on their own, but truly shine with a scoop of vanilla bean ice cream, a dollop of fresh whipped cream, or a drizzle of extra caramel sauce. The contrast of warm pie and cold cream is irresistible.
Storage Solutions: Keeping Them Fresh
Store leftover apple hand pies in an airtight container at room temperature for up to 2-3 days, or refrigerate for up to a week. Ensure they are completely cool before storing to prevent sogginess.
To reheat, pop them in a preheated oven at 300°F (150°C) for about 10 minutes until warmed through and the crust crisps up again, tasting freshly baked. You might also enjoy other apple desserts like apple fritter bites for another warm, comforting treat.
Can You Make Them Ahead? (And How!)
You can prepare the apple-caramel filling a day in advance and store it, covered, in the refrigerator. Assemble and bake the hand pies just before serving for the freshest taste and flakiest crust.
Alternatively, you can assemble the unbaked hand pies, place them on a baking sheet, and freeze until solid. Transfer to a freezer-safe bag and bake from frozen, adding about 5-10 minutes to the baking time and ensuring they reach a golden brown.
Your Apple Hand Pies FAQs Answered
Can I use other types of apples?
Yes, while Gala or Honeycrisp are recommended for their balance of sweetness and firmness, you can use other firm baking apples like Fuji, Granny Smith (for a tarter pie), or a mix of varieties for a more complex flavor. Just ensure they are firm enough to hold shape.
What if I don’t have lemon juice?
The lemon juice brightens the apple flavor and prevents browning. If you don’t have fresh lemon, you can omit it, but the flavor profile might be slightly less vibrant. A tiny pinch of citric acid (about 1/8 teaspoon) could be a substitute if you have it on hand.
Can I freeze apple hand pies?
Absolutely! You can freeze baked `Apple Hand Pies` for up to 3 months. Let them cool completely, then wrap individually in plastic wrap and foil. Thaw at room temperature and reheat in the oven for the best texture.
Is there a dairy-free option for the caramel?
Yes, you can substitute vegan butter and full-fat canned coconut milk (not light) for the butter and heavy cream in the caramel. Be aware that the flavor profile may have a subtle coconut hint, but it will still be delicious and gooey.
Ready to Bake? Share Your Apple Hand Pie Creation!
Now that you have the secret to achieving perfectly gooey caramel and flaky crusts, it’s time to create your own batch of irresistible `Apple Hand Pies`. This recipe is a true crowd-pleaser, perfect for cozy gatherings, afternoon treats, or a delightful on-the-go snack.
We’d love to see your delicious creations! Share your photos and tag us on social media. Happy baking, and enjoy every blissful bite!

Apple Hand Pies
Ingredients
- 2 medium apples, such as Gala or Honeycrisp, peeled cored and diced into half inch pieces
- 1 tablespoon fresh lemon juice
- 1/4 cup granulated sugar, plus more for dusting
- 1/4 teaspoon ground cinnamon
- Pinch of ground nutmeg
- 1 tablespoon all purpose flour or cornstarch
- 1 package pre made pie crusts, or 2 rounds of homemade pie dough
- 1 tablespoon unsalted butter
- 1/4 cup light brown sugar, packed
- 2 tablespoons heavy cream
- Pinch of salt
- 1 large egg, beaten
Instructions
- In a medium bowl, combine the diced apples with lemon juice, 1/4 cup granulated sugar, cinnamon, nutmeg, and the flour or cornstarch. Toss gently to coat. Set aside.
- For the Gooey Caramel Perfection: In a small saucepan over medium heat, melt the butter. Add the brown sugar and a pinch of salt. Stir continuously until the sugar is dissolved and the mixture begins to bubble, about 2 minutes. Pour in the heavy cream and stir well. The mixture will thicken. Continue to cook and stir for another 1 minute, ensuring it is smooth and luscious. Remove from heat. This precise ratio and cooking time for the caramel with the cream is key to its perfect gooey texture later.
- Add the prepared apples to the warm caramel sauce, stirring gently to combine.
- Preheat your oven to 400 degrees Fahrenheit (200 degrees Celsius). Line a baking sheet with parchment paper.
- On a lightly floured surface, roll out one pie crust. Using a 4 to 5 inch round cutter, cut out as many circles as possible. Gather and reroll scraps as needed. Repeat with the second pie crust.
- Spoon about 2 tablespoons of the apple caramel filling onto one half of each pie crust circle, leaving a small border around the edge.
- Brush the edges of the crust with a little of the beaten egg. Fold the other half of the pie crust over the filling to create a half moon shape. Press the edges firmly to seal, then crimp with a fork.
- Place the sealed hand pies on the prepared baking sheet. Brush the tops of the hand pies with the remaining beaten egg and sprinkle generously with extra granulated sugar. Cut a few small slits in the top of each hand pie to allow steam to escape.
- Bake for 18 to 22 minutes, or until the crust is golden brown and the filling is bubbling. Let cool on the baking sheet for at least 10 minutes before serving. This cooling time is crucial for the caramel to set into its perfect gooey, flowing consistency.