There’s nothing quite as disappointing as biting into an enchilada only to find dry, flavorless chicken. I’ve been there countless times, but after years of perfecting, I’ve discovered the simple trick to truly moist and incredibly flavorful Cheesy Chicken Enchiladas. This recipe guarantees a creamy, delicious filling that stays perfectly tender, making it an absolute weeknight winner.
Why This Cheesy Chicken Enchiladas Recipe Stands Out
The “Never Dry” Chicken Secret Revealed
The magic truly happens in the filling. By blending softened cream cheese and sour cream into the shredded chicken, we create a rich, hydrating base. This crucial step locks in moisture, ensuring every bite is succulent, not dry.
Quick Weeknight Comfort, Elevated
This recipe transforms simple ingredients into a satisfying meal without extensive effort. It’s an ideal choice for busy weeknights, offering maximum comfort and flavor with minimal fuss.
Crowd-Pleasing Flavors for Every Palate
With a balanced blend of mild green chiles, savory spices, and gooey Monterey Jack cheese, these enchiladas appeal to everyone. They’re a guaranteed hit for family dinners and casual gatherings alike.
Your Essential Arsenal: Tools for Enchilada Success
Basic Kitchen Necessities
Large Mixing Bowl: You’ll need this for combining your creamy chicken filling ingredients thoroughly.
Sturdy Spatula or Spoon: Essential for stirring and ensuring all components are well incorporated.
Measuring Cups and Spoons: Accuracy in quantities helps maintain the perfect balance of flavors and textures.
Specialized Gear for Perfect Enchiladas
9×13 Inch Baking Dish: This standard size is perfect for neatly arranging eight rolled enchiladas for even baking.
Microwave or Dry Skillet: You’ll use one of these to gently warm your tortillas, making them pliable and easy to roll without tearing.
The Building Blocks: Ingredients for Cheesy Chicken Enchiladas
The Star: Incredibly Moist Chicken Filling
Cooked Chicken Breast, Shredded: Start with fully cooked chicken. You can boil, bake, or use leftover rotisserie chicken for ease, shredded finely for an even texture.
Cream Cheese, Softened: This is the secret ingredient for unparalleled moisture and richness. Ensure it’s at room temperature for easy blending.
Sour Cream: Adds another layer of creaminess and a slight tang, balancing the richness of the cheese and cream cheese.
Diced Green Chiles, Drained: These offer a mild, authentic Tex-Mex flavor without overwhelming heat. Draining them is crucial to prevent a watery filling.
Garlic Powder, Onion Powder, Salt, Black Pepper: These foundational seasonings build a savory base for the chicken, enhancing its natural flavor.
Tortilla Selection: Choosing Your Wrapper
Medium Flour Tortillas: Flour tortillas are ideal for enchiladas as they are soft, pliable, and less prone to tearing than corn tortillas. Warming them slightly before rolling makes them incredibly flexible.
Melty Goodness: The Perfect Cheese Blend
Monterey Jack Cheese, Shredded: This cheese melts beautifully, creating that signature gooey, bubbly top that everyone loves. Its mild flavor complements the chicken filling without overpowering it.
For extra flavor, consider blending Monterey Jack with some sharp cheddar or a Mexican blend for more complexity.
Fresh Finishes: Essential Garnishes
Fresh Diced Tomatoes: Adds a burst of fresh flavor and vibrant color, cutting through the richness of the cheese.
Fresh Parsley, Chopped: A sprinkle of fresh parsley brightens the dish with a clean, herbaceous note and visually elevates the presentation.
From Scratch to Sensation: Crafting Your Cheesy Chicken Enchiladas
Step 1: Prep for Perfection
Before anything else, preheat your oven to 375 degrees Fahrenheit. This ensures it’s ready for baking as soon as your enchiladas are assembled. Lightly grease a 9×13 inch baking dish; this prevents sticking and makes cleanup a breeze.
Step 2: The Creamy Chicken Core
In a large bowl, combine your shredded cooked chicken with the softened cream cheese, sour cream, drained green chiles, garlic powder, onion powder, salt, and a pinch of black pepper. Stir vigorously until all ingredients are thoroughly combined and the mixture is wonderfully creamy.
This is the absolute most critical step to achieving incredibly juicy chicken enchiladas; the cream cheese and sour cream encapsulate the chicken, keeping it moist throughout baking and infusing it with flavor.
Step 3: Soften & Roll with Ease
Warm your flour tortillas slightly to make them pliable. You can do this by microwaving them for 15-20 seconds for the whole stack or quickly heating them individually in a dry skillet for 10-15 seconds per side.
Warming prevents the tortillas from cracking or tearing when you roll them, making the assembly process much smoother.
Step 4: Layering the Flavor
Take one warmed tortilla and spoon approximately 1/4 to 1/3 cup of the creamy chicken mixture down its center. Be mindful not to overfill, which can make rolling difficult.
Roll the tortilla tightly, then place it seam-side down in your prepared baking dish. Continue with the remaining tortillas, arranging them snugly in a single layer in the dish.
Step 5: Golden, Bubbly Bake
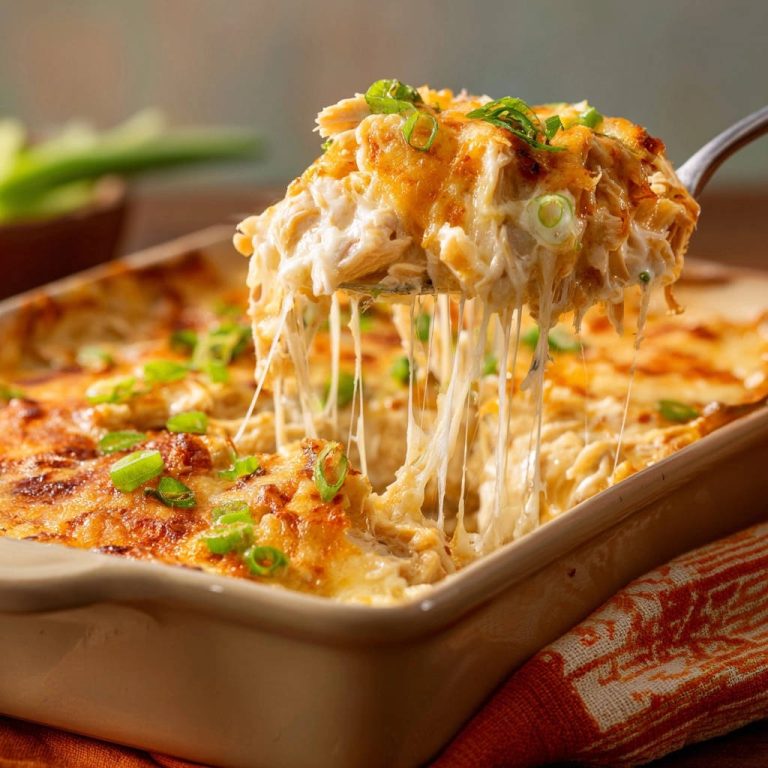
Generously sprinkle the shredded Monterey Jack cheese evenly over the rolled enchiladas. This blanket of cheese will melt into a golden, bubbly topping during baking.
Bake for 20-25 minutes, or until the cheese is beautifully melted and bubbly and the enchiladas are heated through. For an irresistible golden-brown finish, you can briefly broil for 1-2 minutes, but watch them very carefully to prevent burning.
This technique creates a delicious crust similar to what you’d find on ultimate creamy baked mac and cheese.
Step 6: The Patient Payoff
Once baked, remove the Cheesy Chicken Enchiladas from the oven and let them stand for a few minutes before serving. This brief resting period allows the filling to set and the flavors to meld, making them easier to cut and serve without falling apart.
Before serving, garnish with fresh diced tomatoes and chopped parsley for a burst of color and fresh flavor.
Chef’s Secrets: Elevate Your Enchilada Game
Achieving Unrivaled Juiciness: The Creamy Blend
Always ensure your cream cheese is completely softened before mixing. This guarantees a smooth, lump-free, and perfectly integrated creamy filling.
Don’t be shy with the mixing; a well-combined filling ensures even moisture distribution throughout the chicken.
Tortilla Tricks: Preventing Tears & Cracks
Warm your tortillas just enough to make them pliable, not crispy. Overheating can make them brittle.
If using corn tortillas (for a more traditional flavor), a quick dip in warm enchilada sauce or oil before warming can also add flexibility and flavor.
Customizing Your Heat: Green Chiles & Beyond
For more heat, use a spicier diced green chile variety, or add a pinch of cayenne pepper directly to the chicken filling.
Finely diced jalapeños (seeds removed for less heat, or left in for more) can also be added for a fresh kick.
Broiling for That Perfect Golden Finish
If you opt to broil, position your oven rack so the enchiladas are about 6 inches from the heat source.
Stay attentive! Broilers work quickly, and cheese can go from perfectly golden to burnt in seconds.
The Importance of Resting
Resist the urge to cut into the enchiladas immediately. Resting allows the internal temperature to equalize and the filling to firm up slightly.
This ensures clean slices and prevents the creamy filling from oozing out excessively when served.
Troubleshooting Your Cheesy Chicken Enchiladas
Why are my tortillas cracking when I roll them?
Tortillas crack when they are too cold or dry. Ensure your tortillas are properly warmed until they are flexible. Also, consider using fresh tortillas, as older ones can become brittle.
My chicken filling tastes bland or dry.
Blandness often comes from under-seasoning. Don’t skip the garlic powder, onion powder, salt, and pepper, and taste the mixture before rolling. Dryness is avoided by the cream cheese and sour cream; ensure you use the full amounts specified and don’t overbake the enchiladas.

The cheese isn’t as bubbly or golden as I’d like.
Ensure your oven is preheated to the correct temperature. If the cheese isn’t bubbling and golden, your oven might be running cool. For a perfect golden crust, utilize the broiler for 1-2 minutes at the very end of baking, keeping a close eye on it.
Creative Variations & Dietary Adaptations
Spice It Up: Adding a Kick
For those who love a bit of heat, consider adding a teaspoon of your favorite hot sauce to the chicken mixture, or include a finely minced jalapeño. A dash of smoked paprika can also add depth and a subtle spicy note.
Cheese Swaps: Exploring New Textures
While Monterey Jack is classic, feel free to experiment. A blend of cheddar and Monterey Jack creates a sharper, richer flavor. For a milder option, use Colby Jack or even a Mexican cheese blend.
Gluten-Free Enchiladas: Your Options
To make this recipe gluten-free, simply swap the flour tortillas for corn tortillas. Be sure to warm corn tortillas thoroughly, as they tend to crack more easily if not heated adequately. Look for certified gluten-free flour tortillas if you prefer their texture.
Make it Vegetarian: Plant-Based Alternatives
Easily transform this into a vegetarian dish by swapping the chicken for black beans, corn, sautéed bell peppers and onions, or a plant-based chicken substitute. Adjust seasonings as needed to complement the new ingredients.
Serving Suggestions, Storage, and Make-Ahead Tips
What to Serve Alongside Your Cheesy Chicken Enchiladas
These Cheesy Chicken Enchiladas are a complete meal on their own, but they pair wonderfully with classic sides. Serve them with a side of fluffy Mexican rice, a simple black bean salad, or a fresh green salad with a zesty lime vinaigrette to cut through the richness. Guacamole and extra sour cream are always welcome additions.
Storing Leftovers: Keeping Them Fresh
Leftover enchiladas can be stored in an airtight container in the refrigerator for up to 3-4 days. For best results, allow them to cool completely before transferring to storage.
Freezing for Future Feasts
To freeze, assemble the enchiladas in the baking dish but do not bake them. Cover tightly with plastic wrap, then foil, and freeze for up to 3 months. Thaw overnight in the refrigerator before baking as directed.
Alternatively, bake the enchiladas, cool completely, then cut into individual portions and freeze in freezer-safe containers. Reheat individual portions in the microwave or oven until warmed through. This is a fantastic strategy for meal prepping, much like preparing baked stuffed shells ahead of time.
Prep Ahead: Streamlining Dinner
You can prepare the creamy chicken filling up to 2 days in advance and store it in an airtight container in the refrigerator. Shred the cheese ahead of time as well. This makes assembly on dinner night incredibly quick and convenient.
Frequently Asked Questions About Cheesy Chicken Enchiladas
Can I use leftover rotisserie chicken for this recipe?
Absolutely! Using leftover rotisserie chicken is an excellent time-saving hack and works perfectly. Just be sure to shred it finely for the best texture in the creamy filling.
What kind of tortillas are best for enchiladas?
For this specific recipe, medium flour tortillas are recommended because they are pliable and less likely to crack. If you prefer a more traditional flavor, corn tortillas can be used, but ensure they are adequately warmed to prevent tearing.
How do I prevent my enchiladas from getting soggy?
The key to avoiding soggy enchiladas is ensuring your filling isn’t too wet and not over-baking. Our creamy chicken filling is designed to be moist, not watery. Also, ensure your baking dish is lightly greased to prevent the bottom from becoming too saturated.
Can I prepare these Cheesy Chicken Enchiladas ahead of time?
Yes, you can! You can prepare the chicken filling a day or two in advance. You can also assemble the entire dish (without baking) and refrigerate it overnight. Just add about 10-15 minutes to the baking time if baking from cold.
Can I add enchilada sauce to this recipe?
This particular recipe focuses on an internal, creamy chicken filling rather than being drenched in traditional red or green enchilada sauce. However, you can certainly add sauce! Pour a thin layer of your favorite red or green enchilada sauce over the bottom of the baking dish before adding the rolled enchiladas, and then a little more over the top before sprinkling with cheese.
Ready to Impress? Share Your Cheesy Chicken Enchiladas Masterpiece!
There you have it – the definitive guide to crafting Cheesy Chicken Enchiladas that are consistently juicy, flavorful, and incredibly satisfying. This recipe transforms a classic comfort food into a dish that’s both easy to make and deeply impressive.
I encourage you to try this recipe tonight and experience the “never dry” chicken secret for yourself. Don’t forget to share your delicious results with us on social media!

Cheesy Chicken Enchiladas
Course: Main CourseCuisine: Mexican cuisineDifficulty: easy8
enchiladas (4 servings)20
minutes25
minutes45
minutesMexican cuisine
Ingredients
2 cups cooked chicken breast, shredded
1/2 cup cream cheese, softened
1/4 cup sour cream
1 (4 ounce) can diced green chiles, drained
1/2 teaspoon garlic powder
1/2 teaspoon onion powder
1/4 teaspoon salt
Pinch of black pepper
8 medium flour tortillas
2 cups Monterey Jack cheese, shredded
For topping:
1/2 cup diced fresh tomatoes
2 tablespoons fresh parsley, chopped
Directions
- Preheat your oven to 375 degrees Fahrenheit. Lightly grease a 9×13 inch baking dish.
- In a large bowl, combine the shredded cooked chicken with the softened cream cheese, sour cream, drained green chiles, garlic powder, onion powder, salt, and black pepper. Stir well until the mixture is thoroughly combined and creamy. This is the key step to ensuring your chicken stays moist throughout baking.
- Warm the flour tortillas slightly either in the microwave for 15-20 seconds or by quickly heating them in a dry skillet. This makes them more pliable and prevents cracking when rolling.
- Spoon approximately 1/4 to 1/3 cup of the chicken mixture down the center of each tortilla. Roll each tortilla tightly and place them seam-side down in the prepared baking dish.
- Sprinkle the shredded Monterey Jack cheese evenly over the rolled enchiladas.
- Bake for 20-25 minutes, or until the cheese is melted and bubbly and the enchiladas are heated through. For a slightly golden top as seen in the image, you can briefly broil for 1-2 minutes, watching carefully to prevent burning.
- Remove from the oven and let stand for a few minutes before serving. Garnish with fresh diced tomatoes and chopped parsley before enjoying.
Notes
- The key to incredibly moist chicken filling is the combination of cream cheese and sour cream.