Picture this: you’ve spent time carefully preparing a beautiful no-bake cheesecake. You’re excited to slice into it, expecting that perfect, smooth wedge… but then it happens. The filling is soft, mushy, and spills everywhere. It’s frustrating, right? I’ve been there more times than I care to admit, and it almost made me give up on no-bake cheesecakes entirely.
But I’m stubborn, and I was determined to crack the code for a perfectly firm, yet still wonderfully creamy, no-bake filling. After countless experiments, I finally discovered the technique that works every single time. This Creamy Mango Cheesecake recipe isn’t just delicious; it’s guaranteed to set beautifully, giving you those clean slices you dream of. The vibrant flavor of fresh mango paired with the rich, tangy cheesecake base is simply irresistible. Prepare for everyone to ask for your secret!
Why This Creamy Mango Cheesecake Is a Keeper
Beyond the promise of a perfectly set slice, this no-bake mango cheesecake offers so many reasons to make it your go-to recipe, especially during warm weather or whenever you crave a taste of the tropics.
- No-Bake Simplicity: No hot oven needed! Perfect for summer or anytime you want a show-stopping dessert without the baking fuss.
- Guaranteed Firmness: My tried-and-true technique ensures a filling that holds its shape when sliced, making serving easy and impressive.
- Creamy & Dreamy Texture: Despite being firm, the filling is incredibly smooth and luscious, melting in your mouth.
- Vibrant Mango Flavor: It uses both fresh mango chunks and mango puree/jam for a double dose of that sweet, tropical goodness.
- Easy to Make Ahead: This cheesecake requires chilling time, making it an ideal dessert to prepare the day before your event.
If you’re a fan of creamy, no-bake treats that deliver on texture and flavor, you might also enjoy exploring other simple desserts like Easy Chocolate Lasagna or a classic No-Soggy Banana Pudding. There’s a whole world of simple, delightful desserts waiting!
Gathering Your Ingredients for Creamy Mango Cheesecake
Creating this delightful dessert starts with selecting the right components. Each ingredient plays a vital role, from the crunchy base to the bright, fruity topping. Let’s take a closer look at what you’ll need and why these specific items work so well together to achieve that perfect Creamy Mango Cheesecake.
The foundation of any good no-bake cheesecake is a sturdy, flavorful crust. We achieve this with simple pantry staples.

- Graham Cracker Crumbs: About 1 and 1/2 cups. You can buy pre-crushed crumbs or easily make your own by crushing graham crackers in a food processor or a bag with a rolling pin. They provide a classic sweet and slightly sandy base.
- Unsalted Butter, Melted: You’ll need 1/2 cup. Melting the butter allows it to bind the graham cracker crumbs together, forming a cohesive crust that holds its shape. Using unsalted butter gives you control over the saltiness.
Now for the star of the show – the gloriously creamy filling! This combination is the secret to its texture.
- Cream Cheese, Softened: Two 8-ounce packages. Make sure your cream cheese is properly softened to room temperature. This is absolutely crucial for a smooth, lump-free filling. Cold cream cheese will result in a lumpy mess.
- Sweetened Condensed Milk: One 14-ounce can. This provides sweetness and body, acting as a binding agent and contributing to the filling’s luxurious creaminess. Choose a good quality brand for the best flavor.
- Lemon Juice: 1/4 cup. This might seem like a lot, but it’s a key player in the “guaranteed firm set” promise. The acid in the lemon juice reacts with the proteins in the cream cheese and condensed milk, helping the mixture firm up beautifully as it chills. Use fresh lemon juice for the brightest flavor!
- Vanilla Extract: 1 teaspoon. A touch of vanilla enhances the overall sweetness and creaminess, adding a warm depth to the bright mango and tangy cream cheese flavors.
Finally, the tropical finishing touches that make this a Mango Cheesecake!
- Diced Fresh Mango: 1 cup. Choose ripe, sweet mangoes. Dicing them into small, bite-sized pieces provides bursts of fresh fruit throughout the topping.
- Mango Puree or Jam: 1/2 cup. This forms the base of our simple glaze. Using puree (homemade or store-bought) offers a pure mango flavor, while jam adds sweetness and a slightly thicker consistency. Either works!
- Sugar: 2 tablespoons. Just a little extra sweetness for the glaze, balancing the tartness of the mango puree or jam.
- Cornstarch: 1 tablespoon. This is our thickening agent for the glaze, ensuring it sets nicely on top of the cheesecake without running off the sides.
- Water: 2 tablespoons. Used to dissolve the cornstarch and create a smooth, pourable glaze consistency.
Having all your ingredients measured and ready before you start makes the process much smoother. Ensure your cream cheese is truly soft before you begin mixing!
Crafting Your Creamy Mango Cheesecake: Step-by-Step
Making this no-bake cheesecake is straightforward, but paying attention to a few key techniques will ensure you get that perfectly firm set every time. We’ll break down each part, offering insights into why each step is important.
-
Building the Foundation: The Crust. Start by combining the graham cracker crumbs and the melted butter in a medium bowl. Use a fork or your hands to mix until the crumbs are evenly moistened, resembling wet sand. This ensures the butter is evenly distributed and will bind everything together. Next, pour this mixture into the bottom of a 9-inch springform pan. A springform pan is ideal because its removable sides make getting the finished cheesecake out effortless. Use the bottom of a glass or a flat measuring cup to press the crumbs down firmly and evenly across the base of the pan. Compactness is key here for a sturdy crust that won’t crumble when sliced. Pop this crust into the refrigerator to chill while you move on to the filling. Chilling helps the butter solidify, locking the crumbs into a firm base.
-
Whipping the Cream Cheese Base. In a large mixing bowl, place your softened cream cheese. Remember how we stressed softened? This is where it pays off! Using an electric mixer, beat the cream cheese on medium speed until it is completely smooth and creamy, with no lumps visible. This aeration and smoothing are essential for the final texture of the filling.
-
Incorporating the Sweetness. Gradually pour the sweetened condensed milk into the beaten cream cheese while the mixer is on low speed. Beat just until the condensed milk is fully combined and the mixture is homogeneous. Be careful not to overbeat the mixture at this stage; excessive whipping can incorporate too much air, which can sometimes affect the final set of a no-bake filling.
-
The Firmness Secret: Adding the Tang. Now, add the lemon juice and vanilla extract to the cream cheese mixture. Beat on low speed just until everything is smooth and well incorporated. Do you remember reading in the introduction about the secret to firmness? This is it! The specific ratio of cream cheese, condensed milk, and crucially, the acidity from the lemon juice, is what triggers the setting reaction when the cheesecake is chilled. The lemon juice helps the milk proteins in the condensed milk coagulate and firm up the mixture without needing gelatin or baking.
-
Filling the Pan. Carefully pour the smooth cheesecake filling over the chilled graham cracker crust in the springform pan. Use an offset spatula or the back of a spoon to gently spread the filling evenly across the surface, creating a nice, smooth top. Avoid swirling or incorporating air bubbles if possible.
-
The Crucial Chilling Phase. This step is non-negotiable for a firm cheesecake! Cover the springform pan carefully with plastic wrap, ensuring the plastic doesn’t touch the surface of the filling. You can achieve this by placing a few toothpicks around the edges of the pan before stretching the plastic wrap over, creating a little dome. Now, place the cheesecake in the refrigerator and let it chill for at least 6 to 8 hours. For the best results, I highly recommend chilling it overnight. This extended time in the cold allows the chemical reaction triggered by the lemon juice to fully take place and the fats to solidify, resulting in that beautifully firm, sliceable texture. Resist the urge to check on it or slice it early!
-
Preparing the Mango Topping. While your cheesecake is firming up (or towards the end of its chilling time), you can make the simple mango glaze. In a small saucepan, combine the mango puree or jam, sugar, cornstarch, and water. Whisk everything together until the cornstarch is fully dissolved and there are no lumps. Place the saucepan over medium heat. Cook, stirring constantly with a whisk or spoon, until the mixture thickens and becomes clear and glossy. This usually takes about 3 to 5 minutes. The cornstarch needs to cook to activate its thickening power. Remove the saucepan from the heat and let the glaze cool slightly. It will thicken more as it cools, but you want it still pourable.
-
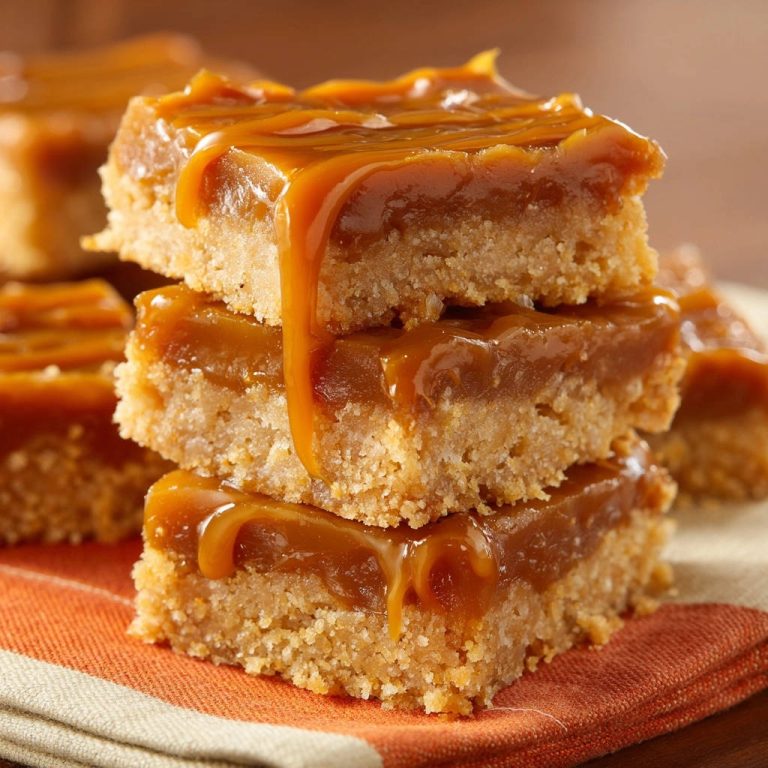
Decorating and Finishing. Once your cheesecake has completed its long chill and is completely firm to the touch, it’s time to add the gorgeous mango topping. Gently run a knife around the edge of the pan before releasing the springform sides to ensure a clean release. Pour the cooled mango glaze evenly over the top of the firm cheesecake, spreading it right to the edges with a spatula. Then, artfully arrange the diced fresh mango chunks over the glaze. The fresh mango adds texture and bright flavor contrast.
-
Final Set Before Serving. Return the decorated cheesecake to the refrigerator for another 30 minutes. This brief chill allows the mango glaze to set slightly, becoming less sticky and ensuring everything holds together beautifully when you slice it. Now, you are ready! Slice your perfectly set, Creamy Mango Cheesecake and enjoy the taste of tropical success.
Tips for Perfect Creamy Mango Cheesecake Every Time
Achieving cheesecake perfection is within reach! Here are a few extra tips to help you get the best results from your Creamy Mango Cheesecake.
- Room Temperature Cream Cheese is Non-Negotiable: Seriously, this is the most important tip for a smooth filling. Take it out of the fridge at least an hour (preferably two) before you plan to mix.
- Don’t Overmix the Filling: Once the condensed milk, lemon juice, and vanilla are added, mix just until smooth. Over-mixing can incorporate too much air, which can lead to a less dense and potentially less stable filling.
- Use Fresh Lemon Juice: Bottled juice works in a pinch, but fresh lemon juice offers a brighter, more vibrant flavor that complements the mango beautifully and ensures the acidity needed for setting.
- Quality Mango Matters: Choose ripe, sweet mangoes for both the diced chunks and, if you’re making your own puree, the puree. The flavor of your mango will significantly impact the final taste of the cheesecake. If using jam, pick one with a good, intense mango flavor.
- Cool the Glaze: Make sure the mango glaze has cooled slightly before pouring it over the cheesecake. Pouring a hot glaze onto a cold cheesecake can create condensation or melt the surface.
- Springform Pan is Best: While you could make this in a regular pan lined with parchment, a springform pan truly is the easiest way to get a clean, impressive presentation.
- Make it Ahead: This cheesecake is perfect for making the day before. The extended chill time only improves its texture and flavor.
- Experiment with the Base: While graham cracker is classic, you could try other cookies for the crust! Vanilla wafers or shortbread cookies would also make a delicious base. Ensure you use the same amount of crumbs (1 1/2 cups) and butter (1/2 cup).
What to Serve With Your Creamy Mango Cheesecake
This cheesecake is fantastic on its own, but a few simple additions can elevate the experience. Think light and refreshing complements that won’t overpower the delicate mango and cream cheese flavors.
- Fresh Mint Sprig: A simple garnish of fresh mint adds a touch of color and a refreshing aroma that pairs wonderfully with mango.
- Whipped Cream: A dollop of freshly whipped cream or a swirl of creamy topping adds extra richness and a soft contrast to the firm cheesecake.
- Coconut Flakes: Toasted or untoasted coconut flakes sprinkled over the top enhance the tropical vibe.
- Extra Fresh Mango: If you’re a true mango lover, serve extra fresh mango chunks on the side.
- A Light Beverage: Pair it with a simple iced tea, sparkling water with lime, or perhaps a Sparkling Strawberry Orange Refresher for a complete dessert experience.
Serving this vibrant cheesecake with a few simple touches makes it even more special.
Your Creamy Mango Cheesecake Questions Answered (FAQ)
Got questions about achieving cheesecake perfection? Here are some common queries about making a firm no-bake cheesecake and working with mango.
Why is my no-bake cheesecake not firming up?
The most common culprits are not using properly softened cream cheese (leading to a less smooth base that can affect setting), not chilling the cheesecake for long enough (the minimum 6-8 hours is essential, overnight is best!), or sometimes, the ratio of ingredients is off. In this specific recipe, the lemon juice is key for activating the setting, so ensure you use the correct amount.
Can I use frozen mango?
Yes, you can use frozen mango for the puree/jam part of the topping after thawing and pureeing it. However, for the diced chunks on top, fresh mango is highly recommended. Frozen mango chunks can become mushy when thawed, affecting the texture on top of the cheesecake.
How long does this cheesecake last in the refrigerator?
Properly stored in an airtight container or well-wrapped, this Creamy Mango Cheesecake should last for 3-4 days in the refrigerator. The crust might soften slightly over time.
Can I make this cheesecake ahead of time?
Absolutely, and in fact, it’s encouraged! Making it the day before serving allows ample time for chilling and ensures the best possible firm texture. Just hold off on adding the diced fresh mango until closer to serving time for the freshest look.
Can I use a different fruit instead of mango?
This recipe relies on the acidity of the lemon juice reacting with the dairy, so swapping the main fruit without adjusting the recipe might affect the set. However, you could potentially use other fruits for the topping glaze (adjusting sweetness as needed) and fresh fruit decoration, provided the cheesecake base still uses the cream cheese/condensed milk/lemon juice combination. For example, you could make a delicious Strawberry Cheesecake variation using a similar base and a strawberry glaze.
Can I freeze this cheesecake?
Yes, you can freeze this no-bake cheesecake! Once fully set and decorated (without the fresh mango chunks on top), wrap the cheesecake tightly in plastic wrap, then in a layer of aluminum foil. It can be frozen for up to 1-2 months. Thaw it slowly in the refrigerator overnight before adding fresh mango and serving.
Enjoy Your Homemade Creamy Mango Cheesecake!
There you have it – the recipe for a truly reliable, perfectly set, and absolutely delicious Creamy Mango Cheesecake. No more worries about runny slices or messy serving! This dessert is a celebration of tropical flavor and simple no-bake technique.
It’s the perfect grand finale for a summer meal, a bright spot on a dreary day, or just because you deserve a slice of creamy, mango-filled happiness. Give it a try, follow the chilling steps closely, and prepare to impress yourself and everyone lucky enough to get a slice.
Have you made this Creamy Mango Cheesecake? I’d love to hear how it turned out in the comments below! What are your favorite no-bake tips?
Creamy Mango Cheesecake

Ingredients
- 1 and 1/2 cups graham cracker crumbs
- 1/2 cup unsalted butter, melted
- 2 packages (8 ounces each) cream cheese, softened
- 1 can (14 ounces) sweetened condensed milk
- 1/4 cup lemon juice
- 1 teaspoon vanilla extract
- 1 cup diced fresh mango
- 1/2 cup mango puree or jam
- 2 tablespoons sugar
- 1 tablespoon cornstarch
- 2 tablespoons water
Directions
- Combine graham cracker crumbs and melted butter in a bowl. Press firmly into the bottom of a 9-inch springform pan. Chill crust in the refrigerator while you prepare the filling.
- In a large bowl, beat softened cream cheese with an electric mixer until smooth and creamy.
- Gradually add the sweetened condensed milk, beating until just combined. Do not overbeat.
- Beat in the lemon juice and vanilla extract until smooth. The key technique for a firm, non-runny filling is this specific combination and the chilling process to follow. The acidity from the lemon juice helps the milk proteins firm up the filling when chilled, working with the richness of the cream cheese and condensed milk.
- Pour the filling over the chilled crust. Smooth the top with a spatula.
- Cover the cheesecake carefully with plastic wrap without touching the surface. This next step is crucial for firmness: Refrigerate for at least 6 to 8 hours, or preferably overnight. This extended chilling time allows the ingredients to fully set and firm up, preventing a soft or runny center. Do not rush this step.
- To make the mango topping, combine mango puree or jam, sugar, cornstarch, and water in a small saucepan. Cook over medium heat, stirring constantly, until the mixture thickens and becomes clear, about 3 to 5 minutes. Let it cool slightly.
- Once the cheesecake is completely firm, gently remove the springform pan sides. Pour the cooled mango glaze over the top, spreading it evenly. Arrange the fresh mango chunks on top of the glaze.
- Return the cheesecake to the refrigerator for another 30 minutes to allow the glaze to set slightly before slicing and serving. Enjoy your perfectly firm and creamy cheesecake!