

Why This Layered Banana Pudding Recipe Changes Everything
This isn’t just another banana pudding recipe; it’s designed to solve common frustrations and elevate your dessert experience.-
The “no mush” cookie texture secret is built right into the method, ensuring your vanilla wafers soften perfectly without dissolving.
-
It’s incredibly easy to follow, making this classic dessert accessible for any home cook, regardless of experience.
-
You’ll get consistently reliable results, so you can confidently prepare this delightful treat for any occasion.
-
The recipe creates a perfect balance of creamy pudding, sweet bananas, and a delightful tender-crisp cookie crunch in every spoonful.
The Essential Ingredients for Your Pudding Masterpiece
Every great dish starts with quality ingredients. Here’s a breakdown of what you’ll need and why each component is crucial.Choosing Your Pudding Base
A standard 3.4 oz box of vanilla pudding mix provides the creamy foundation for our Layered Banana Pudding.
Using cold milk, as directed, and potentially a slightly reduced amount from the box (like 2 cups), ensures a thicker, more stable pudding that sets beautifully.
An optional teaspoon of vanilla extract truly enhances the overall flavor, adding an aromatic depth to the creamy pudding base.
Perfecting the Bananas
Select ripe bananas that are still firm and mostly yellow, with only a few small brown spots.
This ripeness offers optimal sweetness and flavor, preventing them from being too green and starchy, or too soft and mushy.
Slicing them about 1/4 inch thick provides consistent pieces for even layering and a pleasant texture in every bite.

The Crucial Vanilla Wafer Selection
Vanilla wafer cookies are indispensable for their classic flavor and ability to absorb moisture without instantly turning to mush.
Ensure your package is fresh for the best initial crunch, which is key before they begin to tenderize slightly in the pudding.
These wafers form the critical layers, softening just enough to create that delightful tender-crisp contrast.
The Light & Creamy Topping
Thawed whipped topping adds a light, airy, and visually appealing finish to your dessert.
Its delicate texture provides a lovely counterpoint to the richer pudding layers, making each spoonful feel indulgent.
Step-by-Step Perfection: Assembling Your Dream Layered Banana Pudding
Follow these detailed steps to create a show-stopping Layered Banana Pudding that’s sure to impress.- Prepare the Pudding Base:
Begin by preparing the vanilla pudding mix according to package directions. For a slightly thicker and more stable consistency, I recommend using precisely 2 cups of cold milk.
Whisk vigorously for a full 2 minutes, ensuring there are no lumps and the mixture is smooth. If using, stir in the vanilla extract now for an enhanced flavor profile.
- The Critical Chill: Achieving Optimal Pudding Set:
This is the absolute KEY step for preventing soggy cookies and achieving perfect texture in your Layered Banana Pudding. Immediately transfer the whisked pudding to the refrigerator.
Allow it to chill for at least 30 minutes, or until it is completely cooled and noticeably starting to set. It is crucial: do NOT layer the pudding while it is warm, as this is the primary cause of immediate cookie sogginess.
- Slice Your Bananas:
While your pudding is chilling and setting, take this time to thinly slice your ripe bananas.
Aim for uniform slices, about 1/4 inch thick, which ensures even distribution and texture throughout the layers. Set them aside until ready for assembly.
- First Layer: Vanilla Wafers:
Select your serving vessel, whether individual glasses for elegant portions or a medium serving dish for family style. Place a single, even layer of vanilla wafers at the bottom.
You can arrange them whole or gently break them to fit the contours of your dish, ensuring the bottom is covered.
- Second Layer: Fresh Bananas:
Carefully arrange the thinly sliced bananas in an even layer directly over the vanilla wafers.
Ensure the banana slices cover most of the cookie layer, as this provides a rich banana flavor in every bite.
- Third Layer: Cooled Pudding:
Once your pudding is thoroughly chilled and set, gently spoon a generous layer of it over the bananas and cookies.
Smooth it out to ensure the pudding completely covers the cookie layer. The coolness of the pudding is essential here, as it helps prevent the immediate breakdown and sogginess of the wafers.
- Repeat & Build:
Continue to build your beautiful layers, repeating the sequence: another layer of vanilla wafers, followed by more sliced bananas, then another layer of pudding.
Always conclude with a final, smooth layer of pudding on top, ensuring the uppermost cookies are fully covered.
- The Final Chill & Meld:
Refrigerate the assembled Layered Banana Pudding for at least 2 hours. This crucial chilling time allows the flavors to fully meld together and the vanilla wafers to soften slightly to that perfect, tender-crisp texture.
Crucial reminder: To avoid the dreaded excessive sogginess, do not overchill the assembled pudding for multiple days before serving. For the very best texture, aim to serve it within 24 hours of assembly.
- Whipped Topping Finish:
Just before you plan to serve, retrieve your thawed whipped topping. Generously swirl or dollop it over the top of each individual glass or the entire serving dish.
This adds a delightful creaminess and a beautiful, inviting appearance to your dessert.
- The Crumbly Garnish:
For both visual appeal and an added textural pop, sprinkle your Layered Banana Pudding with extra crushed vanilla wafer crumbs or a few whole cookie pieces.
Serve immediately after garnishing, savoring the perfectly balanced flavors and textures.
Chef’s Notes & Pro Tips for Impeccable Banana Pudding
Elevate your Layered Banana Pudding from great to unforgettable with these expert tips.Master the Pudding Chill: Reiterate the utmost importance of fully chilling the pudding before you even begin layering. This prevents the warm pudding from instantly turning your delicate wafers into mush. Patience here is truly a virtue.
Banana Ripeness Matters: For the best flavor and visual appeal, always use firm, ripe bananas that are still mostly yellow with just a hint of brown spots. Overripe bananas can become too soft and visually unappealing within the pudding layers.
Don’t Overchill Assembled Pudding: While chilling is necessary, an extended stay in the refrigerator will lead to complete sogginess. Stick to the 24-hour serving window for optimal tender-crisp texture. Beyond that, the wafers will absorb too much moisture.
Individual vs. Family Style: Serving in individual glasses offers elegant presentation and precise portion control, perfect for a dinner party. A large serving dish, however, is ideal for casual gatherings or potlucks, allowing guests to serve themselves easily.
Flavor Boosts: For a subtle warmth and complexity, consider adding a tiny pinch of freshly grated nutmeg or a whisper of cinnamon to your pudding base when mixing it. This complements the banana flavor beautifully.
Common Questions & Solutions for Your Layered Banana Pudding
Let’s address some of the most common challenges and how to overcome them for perfect results every time.Why Are My Vanilla Wafers Always Mushy?
The primary culprit for mushy wafers is typically layering warm pudding or allowing the assembled pudding to chill for too long. Warm pudding immediately softens the cookies to an undesirable degree.
To avoid this, ensure your pudding is thoroughly chilled and set before assembly. Additionally, serve your Layered Banana Pudding within 24 hours for the ideal tender-crisp texture. For more insights on this common issue, check out our guide on how to make banana pudding that’s never soggy.
Can I Make This Layered Banana Pudding Ahead of Time?
Absolutely! This Layered Banana Pudding is an excellent make-ahead dessert, with an optimal window of up to 24 hours before serving. Store it tightly covered in the refrigerator to maintain freshness.
If you need to prepare it even further in advance, consider prepping components separately. Make the pudding and chill it, slice the bananas, and keep the wafers sealed. Assemble just a few hours before you plan to serve for peak freshness.
What if I Don’t Have Vanilla Wafers?
While vanilla wafers are traditional, you can certainly experiment with substitutions! Shortbread cookies offer a buttery alternative, graham crackers provide a subtle honey note, or even ladyfingers can be used for a slightly different, more cake-like texture.
Be mindful that any substitution will slightly alter the final texture and flavor profile of your Layered Banana Pudding.
Can I Make This Dairy-Free or Gluten-Free?
Yes, with a few adjustments. For dairy-free, use a dairy-free vanilla pudding mix (often found in specialty sections) and swap cow’s milk for a plant-based milk alternative like almond or oat milk. Ensure your whipped topping is also dairy-free.
For gluten-free, use gluten-free vanilla wafer substitutes, which are readily available in most grocery stores. Note that texture variations may occur with these substitutions.
Serving Suggestions & Storage Secrets
Presenting and preserving your Layered Banana Pudding for maximum enjoyment.Ideal Serving Temperatures & Presentation
This dessert is always best served thoroughly chilled. The cool temperature enhances the refreshing quality and firm texture of the pudding.
Beyond crushed wafers, consider elegant garnishes like fresh mint sprigs, delicate chocolate shavings, or even a dusting of cocoa powder for an extra touch of sophistication. You might also enjoy our Decadent Chocolate Trifle for another impressive layered dessert.
How to Store Leftover Layered Banana Pudding
To keep any leftovers fresh, cover the serving dish tightly with plastic wrap or transfer individual portions to airtight containers.
Refrigerate promptly. While still delicious, be aware that the wafers will continue to soften over time. For best quality, consume within 2-3 days.
Ready to Impress? Share Your Banana Pudding Masterpiece!
There’s truly nothing quite like a perfectly executed Layered Banana Pudding. The creamy, cool pudding, sweet bananas, and those perfectly tender-crisp vanilla wafers create a symphony of textures and flavors that bring joy to any gathering. With the secrets to avoiding sogginess now in your culinary toolkit, you’re ready to create a dessert that will be remembered and requested time and again. Go on, give this recipe a try, and watch as your family and friends delight in every delicious spoonful. Don’t forget to share your banana pudding triumphs with us – we love seeing your creations!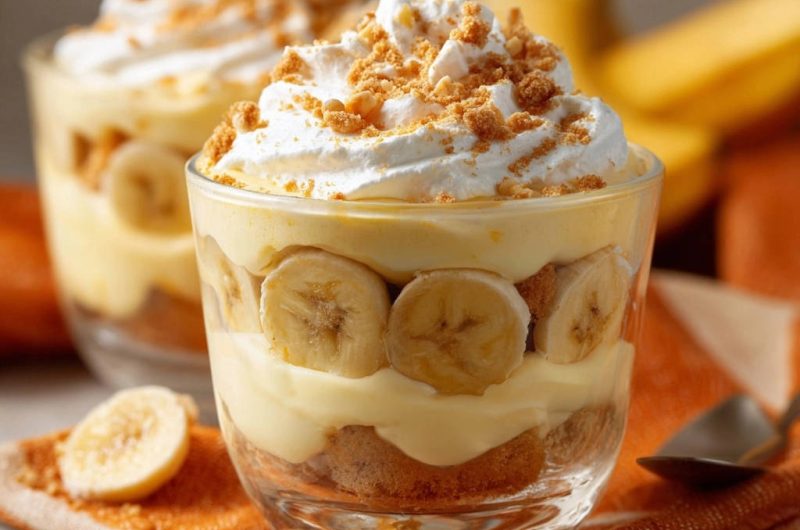
Layered Banana Pudding
Course: DessertCuisine: American CuisineDifficulty: easy8
servings20
minutes2
hours140
minutesAmerican Cuisine
Ingredients
1 box vanilla pudding mix (3.4 oz)
2 cups cold milk (or amount specified on pudding box)
1 teaspoon vanilla extract (optional)
2 ripe bananas
1 package vanilla wafer cookies (about 11 oz)
1 tub whipped topping (8 oz), thawed
Extra crushed vanilla wafers or crumbs for topping
Directions
- Prepare the pudding according to package directions, but use 2 cups of cold milk for a slightly thicker consistency if the box calls for more. Whisk vigorously for 2 minutes. Stir in vanilla extract if using.
- This is key for texture: Let the pudding sit in the refrigerator for at least 30 minutes, or until it is completely cooled and starting to set. Do not layer the pudding while it is warm.
- While the pudding cools, slice the bananas about 1/4 inch thick. Set aside.
- In individual glasses or a medium serving dish, place a layer of vanilla wafers at the bottom. You can leave them whole or break them to fit.
- Layer sliced bananas over the cookies.
- Gently spoon a layer of the cooled, set pudding over the bananas and cookies, making sure to cover the cookies completely. The coolness of the pudding helps prevent immediate sogginess.
- Repeat the layers: cookies, bananas, pudding, ending with a layer of pudding.
- Refrigerate for at least 2 hours to allow the layers to meld and the cookies to soften slightly, but do not overchill for days before serving, as this is when sogginess happens. Serve within 24 hours for best texture.
- Before serving, top each glass or the dish with a generous swirl or dollop of thawed whipped topping.
- Sprinkle with crushed vanilla wafer crumbs or extra cookie pieces for garnish and added texture. Serve immediately.
Notes
- Serve within 24 hours for best texture.


