I distinctly remember the frustration of eagerly slicing into what I hoped would be a show-stopping dessert, only to find the layers had blurred into an unappetizing mess. Especially with a luscious treat like Layered Chocolate Coconut Pie, achieving those perfectly distinct lines felt like a culinary enigma. But through careful experimentation, I’ve cracked the code on making this pie reliably hold its stunning structure, ensuring every slice is a picture of perfection and taste.
Why This Layered Chocolate Coconut Pie Will Become Your Signature Dessert
This Layered Chocolate Coconut Pie isn’t just another dessert; it’s a testament to achieving stunning presentation without culinary acrobatics.
Discover the secret to perfectly set layers that hold their integrity, ensuring every slice is as beautiful as the first.
Experience the delightful contrast of textures, from the crisp graham cracker crust to the silky ganache, all complemented by rich chocolate and tropical coconut flavors.
It’s the ultimate make-ahead dessert, gaining character and stability with every hour it chills, making entertaining effortless.
The Essential Ingredients for Your Decadent Pie Creation
For the Irresistible Crumb Crust Foundation
Graham Cracker Crumbs: The classic choice for a sweet, slightly spiced base. Ensure they are finely crushed for a uniform texture.

Granulated Sugar & Melted Butter: These bind the crumbs, creating a sturdy yet tender foundation that complements the rich fillings.
Crafting the Velvety Caramel Layer
Granulated Sugar & Water: The simple starting point for a deep, amber caramel. Patience is key for the perfect color.
Heavy Cream (Warmed): Added carefully, warm cream helps prevent the caramel from seizing, creating a smooth, pourable consistency.
Unsalted Butter: Enriches the caramel, giving it a luxurious mouthfeel and preventing crystallization.
The Tropical Heart: Coconut Cream Filling
Sweetened Condensed Milk & Full-Fat Coconut Milk: The duo that delivers creamy sweetness and distinctive coconut flavor to this pivotal layer.
Large Egg Yolks: Act as a natural thickener, ensuring the coconut cream sets beautifully firm without being rubbery.
Vanilla Extract & Sweetened Shredded Coconut: Enhances the flavor profile and adds delightful texture, making each bite truly tropical.
Indulgent Chocolate Ganache Topping
Good Quality Semisweet Chocolate: The star of the show; choose a brand you love for the best flavor payoff. Finely chop it for easy melting.
Heavy Cream, Butter & Light Corn Syrup: This combination creates a glossy, stable ganache that sets perfectly. Corn syrup adds shine and prevents blooming.
Finishing Touches: Toasted Coconut Garnish
Sweetened Shredded Coconut (Toasted & Untoasted): A textural and visual delight, offering both a golden crunch and soft chew to crown your Layered Chocolate Coconut Pie.
Gather Your Culinary Toolkit: Essential Pie-Making Gear
9-inch Pie Plate: The stage for your masterpiece. A glass or ceramic plate works best for even baking and chilling.
Heavy-Bottomed Saucepan: Crucial for making caramel evenly without burning. Its thick base distributes heat consistently.
Medium Saucepan: For gently cooking the coconut cream, ensuring smooth thickening without scorching.
Heatproof Bowls: Essential for melting chocolate and preparing the ganache safely.
Whisks (Balloon & Flat): For combining ingredients smoothly and emulsifying the ganache.
Rubber Spatula: Indispensable for spreading layers gently and scraping bowls clean.
Sharp Knife: For clean, precise slices that show off your distinct layers without tearing.
Mastering the Layers: A Step-by-Step Pie Journey
- Prepare the Crumb Crust:
In a medium bowl, combine graham cracker crumbs, granulated sugar, and melted butter. Mix thoroughly until the crumbs are evenly moistened.
Firmly press the mixture into the bottom and up the sides of your 9-inch pie plate. This dense compaction is vital for a stable crust that won’t crumble when sliced.
Crucial Chilling Step: Refrigerate the crust for at least 30 minutes. This helps solidify the butter, preventing the crust from becoming soggy later and ensuring optimal layer stability.
- Craft the Velvety Caramel Layer:
In a heavy-bottomed saucepan, combine sugar and water. Cook over medium-high heat, stirring only until the sugar dissolves, then stop stirring completely.
Continue cooking until the syrup transforms into a rich, deep amber color (this usually takes 8-12 minutes). Remove immediately from heat to prevent burning.
Carefully whisk in the warmed heavy cream; be prepared for vigorous bubbling. Then, whisk in the butter pieces until the caramel is perfectly smooth and glossy.
Pour the warm caramel evenly into the chilled crust. If you love a good combination of caramel and chocolate, you might also enjoy these salted caramel chocolate squares.
The Golden Rule for Layers: Refrigerate for a minimum of 1 hour, or until the caramel is completely firm to the touch. This dedicated firming time is the secret to preventing layers from blending.
- Create the Tropical Coconut Cream Layer:
In a medium saucepan, whisk together sweetened condensed milk, coconut milk, and egg yolks until the mixture is smooth and uniform.
Cook over medium-low heat, stirring continuously, until the mixture thickens significantly, easily coating the back of a spoon (about 8-10 minutes). Constant stirring prevents scorching. For more tips on achieving the perfect coconut cream filling, you might find this perfect coconut cream pie recipe helpful.
Remove from heat and stir in the vanilla extract and sweetened shredded coconut.
Allow the coconut cream to cool slightly before gently spreading it over the firm caramel layer. This prevents the warm cream from melting the caramel below.
Patience for Perfection: Refrigerate for at least 2-3 hours, or until this layer is fully set and firm. This extended chilling ensures the coconut layer maintains its distinct structure.
- Prepare the Indulgent Chocolate Ganache:
Place your finely chopped semisweet chocolate in a medium heatproof bowl.
In a small saucepan, heat heavy cream, butter, and corn syrup (if using) over medium heat. Bring it just to a simmer around the edges; do not boil.
Pour the hot cream mixture directly over the chopped chocolate. Let it sit undisturbed for 5 minutes. This allows the residual heat to melt the chocolate thoroughly, resulting in a silkier, smoother ganache with fewer lumps.
After 5 minutes, gently whisk the mixture from the center outwards until it’s completely smooth and wonderfully glossy.
Allow the ganache to cool for about 15-20 minutes at room temperature, stirring occasionally. It should thicken slightly but remain pourable. This controlled cooling is crucial for a controlled pour and a stable, firm top layer.
- Assemble and Chill to Perfection:
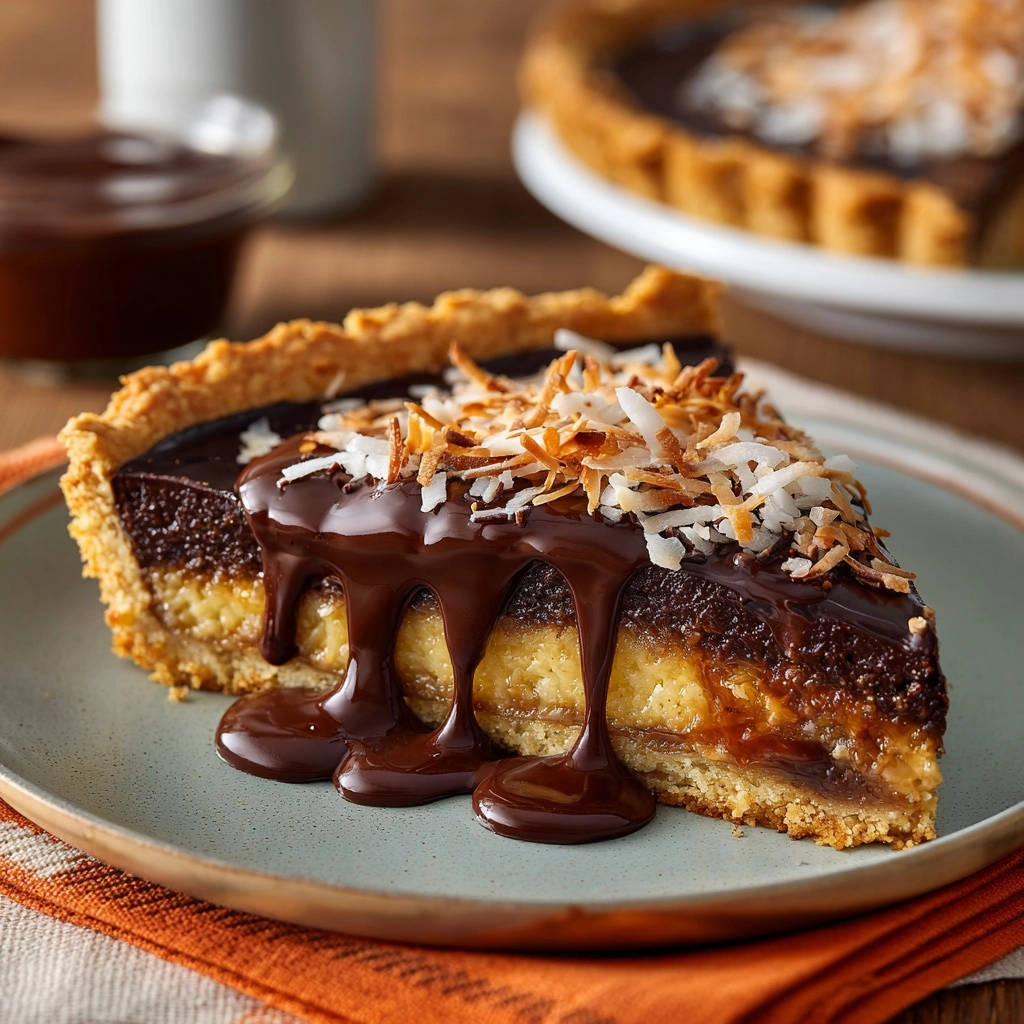
Pour the slightly cooled, thickened ganache over the completely set coconut cream layer. Carefully spread it to cover the entire surface, allowing a little to drip down the sides for an appealing rustic look.
The Final Chill for Flawless Layers: Refrigerate the pie for at least 4 hours, or ideally overnight. This allows all the layers to fully set, marry their flavors, and ensures each layer maintains its beautiful, distinct shape when sliced.
- Presenting Your Masterpiece:
Before serving, generously scatter the lightly toasted and untoasted shredded coconut over the top of the pie for visual appeal and a delightful texture contrast.
Use a sharp, warm knife (wiped clean between slices) for the cleanest cuts, showcasing those perfect layers you worked so hard to achieve. If you’re a fan of rich chocolate desserts, a slice of this pie is right up there with a decadent chocolate fudge pie.
Unlocking Perfection: Expert Tips for Your Layered Chocolate Coconut Pie
Embrace the Chill Factor: The most critical tip for this Layered Chocolate Coconut Pie is respecting the chilling times between each layer. Each firming step prevents mingling and is the secret to those perfectly distinct lines.
Caramel Clarity: When making caramel, resist the urge to stir once the sugar dissolves. Swirling the pan is acceptable, but stirring can cause crystallization. Watch for that deep amber color, not just a light golden hue, for richer flavor.
Coconut Cream Consistency: Stir the coconut cream mixture constantly over medium-low heat. This ensures it thickens evenly without scorching the bottom, which can impart an unpleasant taste.
Ganache Gorgeousness: When pouring hot cream over chocolate for ganache, let it sit undisturbed for 5 minutes before whisking. This allows the heat to melt the chocolate thoroughly, resulting in a silkier, smoother ganache with fewer lumps.
Controlled Ganache Pour: Cool the ganache slightly (15-20 minutes) until it’s slightly thickened but still pourable. This prevents it from immediately seeping into the coconut layer and ensures a stable, even top.
Toasting Coconut for Depth: Lightly toast a portion of your shredded coconut for the topping. The gentle caramelization adds a wonderful nutty depth and visual appeal that contrasts beautifully with the untoasted coconut.
Clean Slices Every Time: For picture-perfect slices, use a sharp knife that has been warmed under hot water and wiped dry. Clean the blade between each slice to prevent dragging layers.
Pie Perfection Pitfalls? We’ve Got Solutions!
Problem: Layers are Blending Together
Solution: The most common culprit is insufficient chilling time between layers. Ensure each layer is completely firm and set to the touch before adding the next. This recipe’s chilling intervals are crucial for maintaining distinct lines.
Problem: Caramel is Granular or Crystalized
Solution: This often happens from stirring the sugar syrup too much once it’s boiling, or from sugar crystals clinging to the sides of the pan. Avoid stirring after the sugar dissolves, and if crystals form, gently brush them down with a wet pastry brush.
Problem: Coconut Cream Didn’t Thicken
Solution: This usually means it wasn’t cooked long enough or over too low a heat. Ensure you cook the mixture over medium-low heat, stirring constantly, until it visibly thickens and coats the back of a spoon. It will continue to firm as it cools.
Problem: Ganache is Too Runny or Too Stiff
Solution (Runny): If it’s too runny after cooling for 20 minutes, it likely needed more cooling time. You can refrigerate it for 5-10 minutes, stirring occasionally, until it reaches a pourable but thickened consistency.
Solution (Stiff): If it became too stiff, gently rewarm it in a double boiler or microwave in 15-second intervals, stirring until it’s pourable again. Be careful not to overheat.
Serving & Savouring: Enjoying Your Layered Masterpiece
How to Serve Your Layered Chocolate Coconut Pie
This pie is best served chilled, allowing its distinct layers and textures to shine. For the cleanest slices, use a sharp, warm knife, wiping it clean between each cut.
Pair a slice with a fresh cup of coffee or a glass of cold milk for a truly satisfying dessert experience. Its richness also makes it a delightful ending to a lighter meal.
Storing Leftovers for Lasting Enjoyment
Leftovers of this Layered Chocolate Coconut Pie should be stored in an airtight container in the refrigerator. This helps maintain the integrity of its layers and prevents it from absorbing other fridge odors.
Properly stored, the pie will remain delicious for up to 3-4 days. The flavors often deepen and meld beautifully on the second day.
Make-Ahead Magic: Prep for Effortless Entertaining
This Layered Chocolate Coconut Pie is an ideal make-ahead dessert! The extended chilling time is crucial for its structure, meaning it benefits from being prepared a day in advance.
You can assemble the entire pie (up to the garnishing step) and refrigerate it overnight. Add the toasted coconut just before serving for optimal freshness and crunch.
Your Layered Chocolate Coconut Pie Questions, Answered
Can I use a store-bought crust for this Layered Chocolate Coconut Pie?
While a homemade graham cracker crust offers superior flavor and stability, you can use a high-quality store-bought graham cracker crust. Just be sure to chill it thoroughly before adding the first layer to prevent it from becoming soggy or losing its shape.
Can I make this pie gluten-free?
Absolutely! Simply substitute gluten-free graham crackers for the crust. The rest of the ingredients in this Layered Chocolate Coconut Pie recipe are naturally gluten-free.
What if I don’t have light corn syrup for the ganache?
Light corn syrup is added for shine and to prevent crystallization, but it’s not strictly essential. You can omit it, and your ganache will still be delicious, though perhaps slightly less glossy.
Can I use unsweetened shredded coconut instead?
Yes, but be aware it will significantly reduce the overall sweetness of the coconut cream layer. If you prefer a less sweet pie, this is a great option. For a similar sweetness level, you might need to add a tablespoon or two of granulated sugar to the coconut cream mixture.
How do I achieve beautifully toasted coconut for the topping?
To toast coconut, spread it in a single layer on a baking sheet. Bake at 325°F (160°C) for 5-10 minutes, stirring occasionally, until golden brown. Alternatively, toast it gently in a dry skillet over medium-low heat, stirring constantly, until fragrant and golden.
Is this pie very difficult to make for a beginner?
While this Layered Chocolate Coconut Pie has several components, each step is straightforward. The key is patience, especially with the chilling times. Take your time, follow the instructions, and you’ll be amazed at your success!
Ready to Impress? Share Your Layered Chocolate Coconut Pie Masterpiece!
You’ve journeyed through each step, mastered the secrets of distinct layers, and now possess the recipe for a truly unforgettable Layered Chocolate Coconut Pie. This isn’t just a dessert; it’s a showstopper, a conversation starter, and a testament to your newfound pie-making prowess.
We encourage you to share your beautiful creation with friends and family, watching their faces light up as they discover the perfect harmony of chocolate and coconut. Don’t forget to tag us on social media and let us know how your pie turned out!
Happy baking, and may your slices always be perfectly distinct and utterly delicious!

Layered Chocolate Coconut Pie
Course: DessertCuisine: American CuisineDifficulty: easy8
servings45
minutes20
minutes510
minutesAmerican Cuisine
Ingredients
For the Crumb Crust:
1 1/2 cups graham cracker crumbs
1/4 cup granulated sugar
1/2 cup unsalted butter, melted
For the Caramel Layer:
1 cup granulated sugar
1/4 cup water
6 tablespoons unsalted butter, cut into pieces
1/2 cup heavy cream, warmed
For the Coconut Cream Layer:
1 (14-ounce) can sweetened condensed milk
1 cup full-fat coconut milk
2 large egg yolks
1/2 teaspoon vanilla extract
1 1/2 cups sweetened shredded coconut
For the Chocolate Ganache:
8 ounces good quality semisweet chocolate, finely chopped
3/4 cup heavy cream
1 tablespoon unsalted butter
1 tablespoon light corn syrup
For Topping:
1/2 cup sweetened shredded coconut, lightly toasted
1/4 cup sweetened shredded coconut, untoasted
Directions
- Prepare the Crust: In a medium bowl, combine graham cracker crumbs, granulated sugar, and melted butter. Mix until well combined and moist. Press the mixture firmly and evenly into the bottom and up the sides of a 9-inch pie plate. For optimal layer stability, chill the crust in the refrigerator for at least 30 minutes.
- Make the Caramel Layer: In a heavy-bottomed saucepan, combine sugar and water. Cook over medium-high heat, stirring until sugar dissolves, then stop stirring. Cook until the syrup turns a deep amber color (about 8-12 minutes). Remove from heat. Carefully whisk in the warm heavy cream (it will bubble vigorously). Then whisk in the butter until smooth. Pour the warm caramel evenly into the chilled crust. Refrigerate for at least 1 hour, or until the caramel is completely firm, before proceeding to the next layer. This firming step is crucial for distinct layers.
- Prepare the Coconut Cream Layer: In a medium saucepan, whisk together sweetened condensed milk, coconut milk, and egg yolks until smooth. Cook over medium-low heat, stirring constantly, until the mixture thickens significantly and coats the back of a spoon (about 8-10 minutes). Remove from heat and stir in vanilla extract and sweetened shredded coconut. Let cool slightly, then carefully spread the coconut cream mixture over the firm caramel layer. Refrigerate for at least 2-3 hours, or until this layer is fully set and firm to the touch. This ensures the coconut layer holds its structure.
- Make the Chocolate Ganache: Place chopped semisweet chocolate in a medium heatproof bowl. In a small saucepan, heat heavy cream, butter, and corn syrup (if using) over medium heat just until it begins to simmer around the edges. Pour the hot cream mixture over the chopped chocolate. Let it sit undisturbed for 5 minutes, then gently whisk until smooth and glossy. Allow the ganache to cool for about 15-20 minutes at room temperature, stirring occasionally, until it slightly thickens but is still pourable. This slight thickening is crucial for a controlled pour and a firm, stable top layer.
- Assemble and Chill: Pour the slightly cooled ganache over the completely set coconut cream layer. Gently spread to cover the entire surface, allowing some to drip down the sides for that beautiful visual. Refrigerate the pie for at least 4 hours, or preferably overnight, to allow all layers to fully set and marry beautifully, guaranteeing each layer holds its distinct shape when sliced.
- To Serve: Before serving, scatter the toasted and untoasted shredded coconut over the top of the pie. Use a sharp knife for clean slices.
Notes
- Ensure each layer is fully chilled and firm before adding the next for perfectly distinct slices.