Oh, the dreaded dry chicken breast! We’ve all been there, right? You picture a tender, succulent piece of chicken, fork-tender and bursting with flavor, only to cut into it and find… well, something closer to shoe leather. It’s incredibly frustrating and, honestly, takes the joy right out of dinner time. For years, I struggled with this exact problem, convinced that juicy chicken breast was some kind of mythical creature I could only encounter at restaurants. But then, I discovered a simple, yet often overlooked, technique that changed everything. Seriously, once you know this trick, dry chicken breast will be a distant, unpleasant memory!
This recipe combines a quick sear on the stovetop with a short finish in the oven, locking in flavor and ensuring even cooking. The real magic, though? It happens after you take the chicken off the heat. We’re going to walk through every step, from selecting the best chicken to that crucial resting period, so you can confidently cook perfectly juicy chicken breast every single time. This is a game-changer for weeknight dinners and meal prep!
Why This Juicy Chicken Breast Recipe Works Wonders
What sets this method apart and guarantees a wonderfully moist result?
- Dual Cooking Method: Starting on the stovetop builds incredible flavor and color through searing, while finishing in the oven cooks the chicken gently and evenly through to the center without drying out the exterior.
- Precision Temperature: We cook to a specific internal temperature (165°F / 74°C), ensuring it’s safe to eat but not overcooked, which is the number one cause of dryness.
- The Essential Rest: This is the secret weapon! Letting the chicken rest allows the juices, which are pushed to the center during cooking, to redistribute throughout the meat. Skipping this step means those precious juices just run out onto your cutting board.
- Simple, Flavorful Seasoning: A classic blend of herbs and spices enhances the natural taste of the chicken without overpowering it.
- Complete Meal Idea: We include a quick and delicious green bean side dish, making it a full dinner solution in one recipe.
Gathering Your Ingredients for Perfectly Juicy Chicken Breast
The beauty of this dish lies in its simplicity. You don’t need a long list of exotic items; just a few pantry staples and fresh ingredients come together to create something truly delicious. Choosing quality ingredients is always a good starting point for any great meal, and that’s especially true when the star is something as simple as a chicken breast.
We’re starting with the foundation: the protein. You’ll need:
- Boneless, Skinless Chicken Breasts: We call for two. Look for breasts that are roughly equal in size and thickness for the most even cooking. Pounding them slightly to an even thickness (about 1 inch) can also help ensure they cook at the same rate.
Next up are the fats and flavor builders that give the chicken that beautiful golden crust and infuse it with aromatic notes:

- Olive Oil and Butter: Using a combination of these fats is ideal. Olive oil has a higher smoke point for initial searing, while butter adds richness and helps achieve that lovely golden-brown color and flavor.
- Dried Herbs: A teaspoon of dried herbs is your aromatic base. Think classic poultry blends like rosemary, thyme, and parsley. Using dried herbs here works beautifully as their flavor concentrates during the cooking process. Feel free to use your favorite herb mix!
- Paprika: Half a teaspoon of paprika adds a lovely color and a touch of mild, sweet pepper flavor. Smoked paprika would lend a different, slightly smoky dimension if you prefer.
- Garlic Powder: A quarter teaspoon of garlic powder provides that essential savory depth that pairs so well with chicken. It distributes more evenly in a dry rub than fresh minced garlic would at this stage.
- Salt and Black Pepper: Essential flavor enhancers. Season generously to bring out the best in the chicken.
For our quick and easy side dish:
- Fresh Green Beans: One pound of fresh green beans provides a vibrant, healthy contrast to the rich chicken. Look for crisp, firm beans.
- Butter for Green Beans: A tablespoon to toss the cooked green beans in for flavor and a little sheen.
- Salt and Pepper for Green Beans: To season the vegetables to perfection.
And finally, an optional addition for a simple finish:
- Splash of Chicken Broth: If you like a little pan sauce to drizzle over your chicken and veggies, a splash of chicken broth deglazes the pan and captures all those delicious browned bits left behind from searing the chicken.
Crafting Your Juicy Chicken: Step-by-Step Guide
Ready to transform those chicken breasts into culinary masterpieces? Follow these steps carefully, paying special attention to the timing and temperature. Remember, the goal is juicy perfection, not just cooked chicken!
-
Prep for Success: Preheat and Pat Dry
First things first, get your oven ready. Preheat it to 400 degrees F (200 degrees C). While the oven heats, turn your attention to the chicken. Pat each boneless, skinless chicken breast completely dry using paper towels. This step might seem minor, but it is absolutely crucial! Excess moisture on the surface of the chicken will cause it to steam in the pan instead of searing properly, preventing you from getting that beautiful golden-brown crust that adds so much flavor.
-
Flavor Foundation: Seasoning Your Chicken
In a small bowl, combine your dried herbs (like rosemary, thyme, and parsley), paprika, garlic powder, salt, and black pepper. Give it a quick mix. Now, sprinkle this seasoning mixture generously over both sides of each chicken breast. Don’t be shy! Getting a good, even coating ensures every bite is flavorful.
-
Heat Things Up: Preparing the Skillet
Choose an oven-safe skillet for this recipe – cast iron or stainless steel works perfectly. Place the skillet over medium-high heat on your stovetop. Add the olive oil and the first tablespoon of butter to the hot pan. Let the fats heat up. You’ll know the pan is ready when the butter has melted and the mixture is shimmering slightly. This indicates the pan is hot enough for a good sear.
-
The All-Important Sear: Golden Brown Goodness
Carefully place the seasoned chicken breasts into the hot, shimmering skillet. Make sure not to overcrowd the pan; if you’re cooking more than two breasts, you might need to work in batches. Let the chicken sear undisturbed for 3 to 4 minutes per side. You’re looking for a deep golden-brown color on the surface. This searing step is vital for developing flavor and creating a delicious crust.
-
Into the Oven: Finishing the Cook
Once both sides are beautifully seared, it’s time to move the skillet. Carefully transfer the entire oven-safe skillet to your preheated 400°F (200°C) oven. The chicken will continue cooking through in the gentler, even heat of the oven. Roast for 8 to 12 minutes. The exact time will depend on the thickness of your chicken breasts. The absolute best way to know they’re done is to use an instant-read thermometer. Insert it into the thickest part of the chicken breast; it should read 165 degrees F (74 degrees C). Cooking to the correct internal temperature is the critical factor for both food safety and ensuring your chicken is perfectly cooked without being dry.
-
The Magic Step: Rest, Rest, Rest!
Here it is – the secret that transforms good chicken into perfectly juicy chicken! As soon as the thermometer hits 165°F (74°C), remove the skillet from the oven. Immediately transfer the cooked chicken breasts to a clean cutting board. Loosely tent the chicken with aluminum foil. Now, walk away and let them rest for at least 5 to 10 minutes before you even think about slicing them. This resting period is scientifically crucial. During cooking, the muscle fibers contract, squeezing juices towards the center. Resting allows those fibers to relax and the juices to redistribute evenly throughout the meat. If you slice too soon, those juices will just run out, leaving you with that dry texture you want to avoid.
-
While it Rests: Quick Green Beans
While your chicken is having its all-important rest, you have the perfect window to prepare the green beans. You can quickly steam or blanch the fresh green beans until they are tender-crisp – vibrant green with a slight bite. In a separate pan, melt the second tablespoon of butter. Add the cooked green beans and toss them with salt and pepper to taste. Simple, quick, and the perfect fresh companion to the chicken.
-
Optional Finishing Touch: Simple Pan Sauce
If you desire a little extra flavor boost, you can make a quick pan sauce. Place the skillet you used for the chicken back on the stovetop over medium heat (be careful, the handle will still be hot!). Add a splash of chicken broth to the warm pan. Use a wooden spoon or spatula to scrape up any browned bits stuck to the bottom of the skillet – these are packed with flavor! Let the broth simmer for just about a minute to reduce slightly and incorporate those flavors. This creates a light, savory drizzle.
-
Slice and Serve: Enjoy Your Juicy Creation!
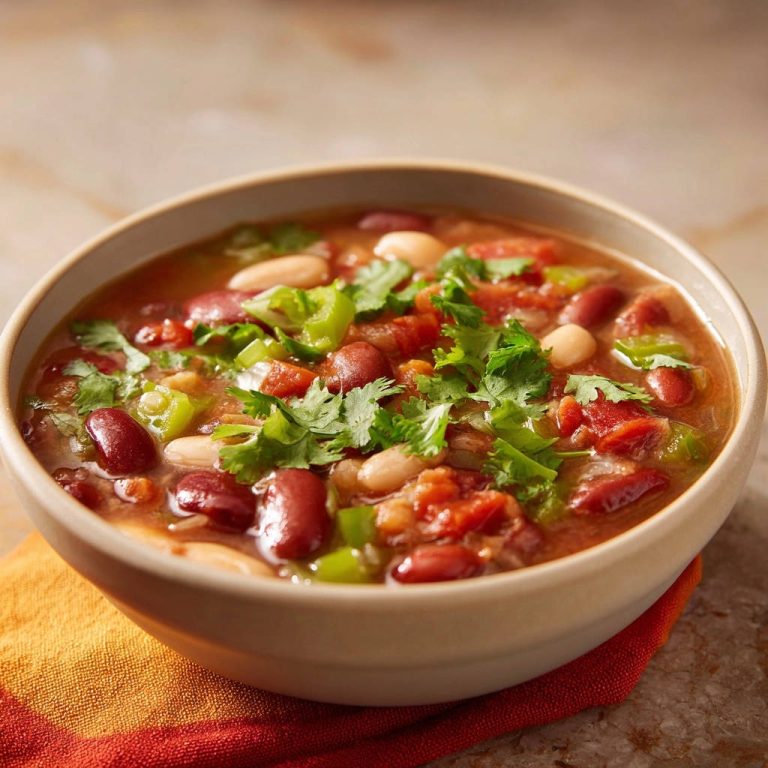
Once the chicken has rested for the full 5-10 minutes, slice it against the grain. Slicing against the grain shortens the muscle fibers, making the chicken even more tender to eat. Arrange the sliced chicken on plates alongside your buttered green beans. Drizzle with any pan sauce you made or simply pour the delicious resting juices from the cutting board over the top. Get ready to enjoy chicken that is incredibly moist, tender, and flavorful!
Tips for Perfect Juicy Chicken Breast Every Time
Achieving consistently juicy chicken isn’t hard once you know the key steps, but a few extra tips can make all the difference!
- Start with Quality Chicken: Fresh, well-sourced chicken breasts tend to yield better results. If using frozen chicken, make sure it is fully thawed in the refrigerator before cooking.
- Even Thickness is Key: If your chicken breasts have a very thick end and a thin end, gently pound the thicker part with a meat mallet (or a heavy pan) until the breast is uniform in thickness. This ensures it cooks evenly, preventing the thinner part from drying out before the thickest part reaches 165°F.
- Don’t Skimp on the Rest: Seriously, this is non-negotiable for juicy results. Set a timer if you need to! That 5-10 minutes makes a world of difference.
- Adjust Cook Time for Thickness: The oven roasting time (8-12 minutes) is an estimate. Thicker breasts will take longer, thinner ones less time. Always rely on your instant-read thermometer to hit 165°F (74°C).
- Consider Different Herb Blends: Don’t feel limited to the suggested herbs. Try Italian seasoning, herbs de Provence, or even just salt, pepper, and garlic powder for a simpler flavor. For a different take, you could explore seasonings perfect for grilled chicken thighs or even a rub similar to what you might use for a perfect pan-seared steak!
- Make it a Meal Prep Staple: Cook a batch of these juicy chicken breasts at the start of the week. Slice or chop them for salads, sandwiches, grain bowls, or quick additions to pasta dishes like our Creamy Chicken Fettuccine. Store in an airtight container in the refrigerator for 3-4 days.
What to Serve With Your Juicy Chicken Breast
This perfectly cooked chicken breast is incredibly versatile! While we included green beans, which are always a great choice, you can pair it with countless sides to create a complete and satisfying meal.
- Roasted Vegetables: Alongside the green beans, think about adding roasted parmesan asparagus, roasted broccoli, or even some simple oven-roasted potatoes.
- Rice or Grains: Serve over perfect fluffy rice, quinoa, or your favorite grain blend. This is perfect for absorbing those lovely pan juices or resting juices.
- Salads: Slice the chicken and add it to a fresh garden salad or a more composed salad like our Vibrant Greek Salad or a classic Perfect Classic Caesar Salad.
- Pasta: As mentioned, sliced chicken breast is fantastic stirred into creamy pasta dishes or served alongside simple buttered noodles.
- Bread: Don’t forget some crusty bread or our Cheesy Herb Knots to soak up any extra goodness!
Your Perfectly Juicy Chicken Breast Questions Answered (FAQ)
Let’s address some common questions you might have about cooking chicken breast this way.
Why does chicken breast often turn out dry?
The most common reason for dry chicken breast is simply overcooking. Chicken breast is very lean, meaning it has little fat compared to darker meat like thighs or wings. Without fat to keep it moist, it dries out very quickly once it surpasses its ideal internal temperature. Cooking too high for too long, or not letting it rest, are the main culprits.
Is the resting step really that important?
Absolutely! The resting step is arguably the most important part of achieving a juicy result with lean meats like chicken breast. As the chicken cooks, the proteins tighten and force moisture to the center. When you let it rest off the heat, the proteins relax, allowing those trapped juices to redistribute throughout the entire breast. If you cut into it immediately, all those juices will run out, leaving the meat dry.
What is the safe internal temperature for chicken?
According to food safety guidelines, chicken should be cooked to an internal temperature of 165 degrees F (74 degrees C). Using an instant-read thermometer is the most reliable way to ensure your chicken is cooked through but not overcooked. Insert the thermometer into the thickest part of the breast, avoiding the bone if there was one.
Can I use frozen chicken breasts?
Yes, you can use frozen chicken breasts, but they must be fully thawed before cooking. Thawing in the refrigerator is the safest and recommended method. Attempting to cook chicken breast from frozen will result in uneven cooking, where the outside overcooks while the inside is still raw or undercooked, leading to a dry exterior and unsafe interior.
How long can I store leftover cooked chicken breast?
Leftover cooked chicken breast should be stored in an airtight container in the refrigerator. It is best consumed within 3-4 days for optimal quality and safety. Reheat gently to avoid drying it out – a little chicken broth or water can help keep it moist when reheating in a pan or microwave.
Can I make this recipe without an oven-safe skillet?
Yes, you can adapt the recipe. Sear the chicken in any skillet according to steps 3 and 4. Then, instead of transferring the skillet to the oven, carefully transfer the seared chicken breasts to an oven-safe baking dish or sheet pan and proceed with step 5 in the oven. Just make sure you still perform the crucial resting step afterward!
Enjoy Your Homemade Perfectly Juicy Chicken!
Gone are the days of disappointing, dry chicken! With this method, you now have the secret to unlocking incredibly moist, tender, and flavorful chicken breast every single time. It’s a simple technique, but it makes a world of difference. Whether you serve it simply sliced with the resting juices and green beans, or incorporate it into your favorite dishes, you’ll be amazed at the results.
Give this recipe a try and say goodbye to dry chicken forever! If you make it, please leave a comment below and let me know how juicy your chicken turned out. Happy cooking!
Perfectly Juicy Chicken Breast

Ingredients
- 2 boneless, skinless chicken breasts
- 1 tablespoon olive oil
- 1 tablespoon butter
- 1 teaspoon dried herbs (like a mix of rosemary, thyme, and parsley)
- 1/2 teaspoon paprika
- 1/4 teaspoon garlic powder
- Salt and black pepper to taste
- 1 pound fresh green beans
- 1 tablespoon butter (for green beans)
- Salt and pepper to taste (for green beans)
- Splash of chicken broth (optional, for pan sauce)
Directions
- Preheat oven to 400 degrees F (200 degrees C). Pat chicken breasts completely dry with paper towels. This is important for a good sear.
- In a small bowl, mix dried herbs, paprika, garlic powder, salt, and pepper. Sprinkle generously over both sides of the chicken breasts.
- Heat olive oil and 1 tablespoon butter in an oven safe skillet over medium-high heat until shimmering.
- Carefully place chicken breasts in the hot skillet. Sear for 3 4 minutes per side until deeply golden brown.
- Transfer the skillet to the preheated oven. Roast for 8 12 minutes, or until an instant-read thermometer inserted into the thickest part of the chicken reads 165 degrees F (74 degrees C). Cooking to the correct internal temperature is key!
- Here’s the secret: Remove the skillet from the oven and immediately transfer the chicken breasts to a cutting board. Tent loosely with foil and let them rest for at least 5 10 minutes before slicing. This resting period is crucial for juices to redistribute, keeping the chicken incredibly moist.
- While the chicken rests, quickly prepare the green beans. Steam or blanch green beans until tender-crisp. Melt 1 tablespoon butter in a pan and toss green beans with salt and pepper.
- (Optional Pan Sauce) If desired, place the skillet used for chicken back on medium heat. Add a splash of chicken broth and scrape up any browned bits from the bottom. Let it simmer for a minute.
- Slice the rested chicken against the grain. Serve sliced chicken with green beans, drizzled with any pan sauce or resting juices. Enjoy your perfectly juicy chicken!