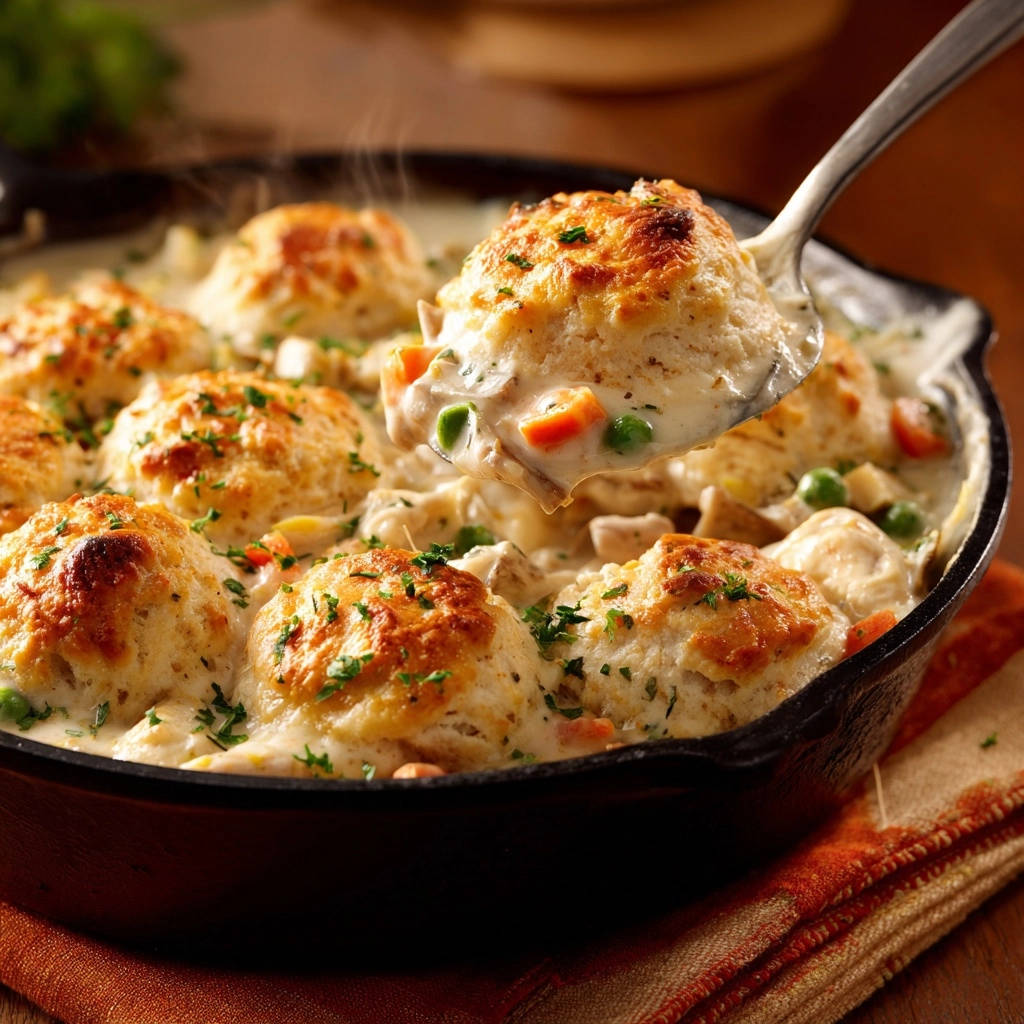
There’s nothing quite like a bubbling hot chicken pot pie, especially when it’s topped with those irresistible golden biscuits. I used to struggle with pale tops or doughy centers, but a simple technique guarantees perfectly cooked, fluffy, and beautifully browned biscuits every single time, elevating this classic Skillet Chicken & Biscuit Pot Pie to a new level.
This recipe delivers the ultimate cozy comfort, ensuring your family will ask for it again and again.
Why This Skillet Chicken & Biscuit Pot Pie Will Become Your Family’s Favorite
The Magic of “No More Doughy Centers”
This recipe employs a clever baking method, placing raw biscuit dough directly onto the hot filling in a preheated skillet.
The residual heat from the skillet ensures the biscuit bottoms cook thoroughly from below, preventing any unpleasant doughiness.
Effortless Comfort: Weeknight Ready Perfection
Using cooked chicken and a streamlined process makes this Skillet Chicken & Biscuit Pot Pie surprisingly achievable on a busy weeknight.
You get that deeply satisfying, home-cooked flavor without hours of kitchen work.

The All-in-One Skillet Advantage
From stovetop to oven to table, everything happens in one pan with this recipe.
This dramatically cuts down on cleanup, making the entire experience even more enjoyable.
Equipping Your Kitchen: Essential Tools for Skillet Pot Pie Success
The Star Player: Choosing Your Oven-Safe Skillet
A good quality, heavy-bottomed, oven-safe skillet is non-negotiable for this recipe.
Cast iron is ideal as it retains heat exceptionally well, promoting even baking and that coveted golden crust on your Skillet Chicken & Biscuit Pot Pie.
Biscuit-Making Essentials
Having the right tools simplifies biscuit preparation and ensures the best texture.
A pastry blender or two forks will help you cut in the butter effectively.
A 2-inch round biscuit cutter creates perfectly uniform biscuits, though a sharp knife can also be used.
The Heart of the Home: Gathering Your Skillet Pot Pie Ingredients
Quality ingredients are the foundation of any great dish. Here’s what you’ll need for an exceptional Skillet Chicken & Biscuit Pot Pie.
For the Rich, Creamy Filling
Cooked Chicken: Diced, leftover rotisserie chicken or quickly boiled chicken breasts work perfectly.
Fresh Vegetables: Diced carrots and frozen peas add essential nutrients, color, and sweetness.
Unsalted Butter & All-Purpose Flour: These form the base of your roux, creating a smooth, rich sauce.
Chicken Broth & Whole Milk/Half-and-Half: The liquid base for the creamy sauce; whole milk adds extra richness.
Seasonings: Salt, black pepper, and dried thyme provide classic savory pot pie flavor. Freshly ground pepper offers the best taste.
Crafting the Golden, Fluffy Biscuits
All-Purpose Flour: The structure for your tender biscuits.
Baking Powder: This leavening agent is crucial for a high, fluffy rise.
Salt: Balances the flavor of the biscuits.
Cold Unsalted Butter: Cut into small cubes, this is the secret to flaky, tender layers.
Whole Milk or Buttermilk: Whole milk provides richness; buttermilk adds a slight tang and promotes tenderness.
Fresh Finishes and Flavor Boosters
Fresh Parsley: Chopped parsley adds a bright, herbaceous garnish and a pop of color to your finished dish.
Mastering the Method: Crafting Your Skillet Chicken & Biscuit Pot Pie
- Preheat and Prep:
Set your oven to 400°F (200°C), allowing it ample time to reach and maintain the correct temperature.
- Building the Velvety Filling:
In a large, oven-safe skillet, melt 2 tablespoons of butter over medium heat. Whisk in 1/4 cup of all-purpose flour and cook for 1 minute, stirring constantly, to create a smooth roux.
Gradually whisk in 2 cups of chicken broth, then 1 cup of whole milk or half-and-half. Bring the mixture to a gentle simmer, stirring continuously, until the sauce thickens to your desired consistency.
Season the filling with 1 teaspoon salt, 1/2 teaspoon black pepper, and 1/2 teaspoon dried thyme. Taste and adjust if necessary.
- Infusing the Filling with Goodness:
Stir in the 2 cups of diced cooked chicken, 1 cup of diced carrots, and 1 cup of frozen peas. Continue to cook for 5-7 minutes, or until the carrots are tender and the filling is heated through and gently bubbling.
Remove the skillet from the heat, keeping the filling hot for the biscuit topping.
- The Secret to Perfect Biscuits: Dry Ingredients:
In a large bowl, whisk together 2 cups of all-purpose flour, 1 tablespoon of baking powder, and 1/2 teaspoon of salt.
Thoroughly whisking ensures all leavening agents and seasonings are evenly distributed, leading to uniform biscuit rise.
- The Secret to Perfect Biscuits: Cold Butter Magic:
Add 6 tablespoons of cold, small-cubed unsalted butter to the dry ingredients. Use a pastry blender, two forks, or your fingertips to cut the butter into the flour until the mixture resembles coarse crumbs with some visible pea-sized pieces of butter remaining.
Keeping the butter cold is paramount; it melts slowly in the hot oven, creating pockets of steam that result in incredibly flaky biscuit layers.
- The Secret to Perfect Biscuits: Gentle Hydration:
Pour in 3/4 cup of whole milk or buttermilk all at once. Mix with a fork just until combined and a shaggy dough forms.
Avoid overmixing at all costs; overmixing develops gluten, which will lead to tough, dense biscuits instead of light, fluffy ones.
- Shaping Your Biscuits:
Turn the shaggy dough out onto a lightly floured surface. Gently knead 3-4 times, just enough to bring the dough together into a cohesive mass.
Pat or roll the dough to about 1/2 inch thick. Minimal handling is crucial here to maintain tenderness.
- Cutting the Rounds:
Using a 2-inch round biscuit cutter or a sharp knife, cut out the biscuits. You should yield approximately 8-10 biscuits.
If you need to, gather and gently re-roll any scraps to cut additional biscuits, handling the dough as little as possible.
- The Grand Finale: Baking to Golden Perfection:
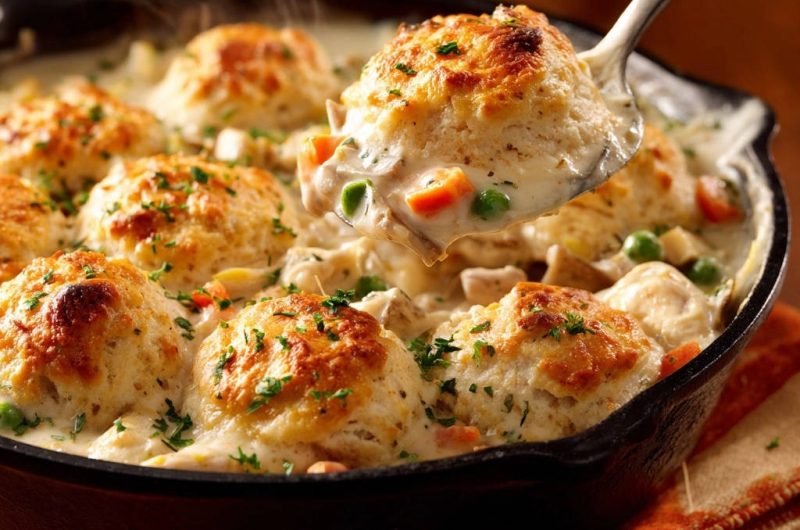
Carefully arrange the cut biscuits directly on top of the hot chicken filling in the skillet. Try to space them slightly so they have room to expand and brown evenly.
Bake your Skillet Chicken & Biscuit Pot Pie in the preheated 400°F (200°C) oven for 20-25 minutes, or until the biscuits are deep golden brown on top and cooked through.
The hot filling generates steam, which significantly helps the biscuits rise beautifully, ensuring a fluffy interior. Simultaneously, the high oven temperature creates that irresistible golden crust, and the residual heat from the skillet ensures the biscuit bottoms are cooked perfectly, preventing any doughy centers.
- Rest and Serve:
Let the skillet rest for a few minutes after baking to allow the filling to set slightly and prevent it from being too runny when served.
Garnish with fresh chopped parsley for a final touch of color and fresh flavor before serving this delightful Skillet Chicken & Biscuit Pot Pie.
Unlocking Pot Pie Perfection: Expert Tips & Tricks
The Golden Rule of Cold Butter
Always use very cold butter for your biscuits. The tiny pieces of butter create pockets of steam as they melt in the oven, which results in flaky, layered biscuits.
If your kitchen is warm, you can even chill your flour and mixing bowl for 10-15 minutes before starting.
Why Less Is More: Avoiding Overmixing
Overmixing biscuit dough develops gluten, leading to a tough, dense texture.
Mix only until the ingredients are just combined and a shaggy dough forms, then handle it minimally during shaping.
The Steam & Heat Advantage: Understanding Your Oven
The hot filling creates steam that helps the biscuits rise dramatically, resulting in a light, airy interior.
A properly preheated oven ensures the biscuits bake quickly and achieve that beautiful golden crust before drying out.
Flavor Enhancements for Your Filling
Consider adding a pinch of smoked paprika or a dash of hot sauce for a subtle kick.
Roasted garlic or a blend of fresh herbs like rosemary and sage can also elevate the filling’s depth.
Perfectly Diced Chicken: Size Matters
Ensure your cooked chicken is diced into uniform, bite-sized pieces.
This ensures even distribution throughout the filling and a pleasant texture in every spoonful of your Skillet Chicken & Biscuit Pot Pie.
Personalize Your Skillet Pot Pie: Creative Twists & Delicious Variations
Veggie Swaps for Seasonal Flavor
Feel free to substitute or add other vegetables based on the season or your preference.
Consider mushrooms, corn, green beans, or even diced potatoes for added heartiness in your Skillet Chicken & Biscuit Pot Pie.
Meat Alternatives & Protein Boosts
Cooked turkey makes an excellent alternative, especially after holidays.
For a vegetarian option, use hearty mushrooms, chickpeas, or a mix of root vegetables in a flavorful vegetable broth base.
Cheese Please! Adding Dairy Delights
Stir a handful of shredded cheddar or Gruyere into the chicken filling for a cheesy twist.
A sprinkle of Parmesan on top of the biscuits during the last few minutes of baking adds a savory, crisp crust.
Herb and Spice Adventures
Beyond thyme, explore other herbs like sage, rosemary, or a blend of Italian herbs in your filling.
A pinch of nutmeg can enhance the creamy sauce, adding warmth and depth.
Prep Ahead & Savor Later: Make-Ahead and Storage Solutions
Making it Work: Prep Day Options
You can cook and dice your chicken ahead of time, storing it in the fridge.
The entire filling (steps 2-4) can be prepared a day in advance, cooled completely, and refrigerated. Reheat gently before topping with fresh biscuits and baking.
Reheating for Fresh-Baked Taste
Leftovers of Skillet Chicken & Biscuit Pot Pie can be reheated in a 300°F (150°C) oven until warmed through, often covered to prevent the biscuits from drying out.
For crispier biscuits, uncover for the last 5-10 minutes of reheating.
Freezing for Future Feasts
To freeze, prepare the filling and biscuits as directed, but do not bake. Assemble the unbaked pot pie in the skillet, then cover tightly with foil and freeze for up to 2-3 months.
When ready to bake, transfer directly from the freezer to a preheated 400°F (200°C) oven, adding about 30-40 minutes to the baking time, or until the biscuits are golden and cooked through and the filling is bubbling.
Solving Common Pot Pie Puzzles: Troubleshooting Your Way to Success
Problem: Biscuits Aren’t Golden Brown
This often points to an oven that isn’t hot enough or a lack of spacing between biscuits, which traps steam.
Ensure your oven is fully preheated and leave a little room for expansion. A hot skillet also helps brown the bottoms.
Problem: Filling Too Runny or Too Thick
If your filling is too runny, simmer it longer to reduce and thicken the sauce, or mix a tiny bit of flour with cold water into a slurry and whisk it into the simmering filling.
If it’s too thick, simply whisk in a splash more chicken broth or milk until it reaches your desired consistency.
Problem: Biscuits Are Tough or Dry
The most common culprit here is overmixing the biscuit dough, which develops too much gluten.
Ensure you handle the dough minimally and only mix until just combined. Overbaking can also dry them out, so watch for golden color.
Problem: Filling is Bland
A bland filling usually means it needs more seasoning.
Don’t be afraid to taste and adjust salt, pepper, and herbs before baking. A squeeze of lemon juice or a dash of white wine vinegar at the end can also brighten flavors.
Your Skillet Chicken & Biscuit Pot Pie Questions Answered
Can I use pre-made biscuit dough for this Skillet Chicken & Biscuit Pot Pie?
Yes, you can, but the texture and flavor won’t be as superior as homemade. Pre-made dough offers convenience, but may not achieve the same flaky, tender results.
Adjust baking times according to package directions, but still ensure the filling is hot underneath for optimal results.
What if I don’t have an oven-safe skillet?
No problem! Prepare the filling in any large saucepan on the stovetop.
Once the filling is ready, transfer it to a 9×13 inch baking dish, then top with the homemade biscuits and proceed with baking in the oven.
Can this Skillet Chicken & Biscuit Pot Pie recipe be made gluten-free?
Yes, you can substitute the all-purpose flour for a good quality gluten-free all-purpose flour blend (one that contains xanthan gum).
Expect a slightly different texture in the biscuits, but it will still be delicious and satisfying.
How do I prevent the chicken filling from becoming watery?
Ensure your vegetables are not overcooked or water-logged before adding them. Simmer the sauce adequately to reduce excess moisture.
Using whole milk or half-and-half instead of skim milk also contributes to a thicker, creamier, less watery filling.
A Family Favorite for Good Reason: Share Your Skillet Pot Pie Story!
This Skillet Chicken & Biscuit Pot Pie truly embodies comforting, homemade goodness, elevating a classic dish with simple, effective techniques.
The promise of perfectly flaky, golden biscuits and a rich, savory filling makes it an instant favorite for any meal.
I encourage you to try this recipe, share it with your loved ones, and savor the joy it brings. I’d love to hear your experiences and how this Skillet Chicken & Biscuit Pot Pie became a cherished dish in your home!
Skillet Chicken & Biscuit Pot Pie
Course: Main CourseCuisine: American CuisineDifficulty: easy4
servings (8-10 biscuits)25
minutes25
minutes50
minutesAmerican Cuisine
Ingredients
2 cups cooked chicken, diced
1 cup diced carrots
1 cup frozen peas
4 tablespoons unsalted butter, divided
1/4 cup all-purpose flour (for filling)
2 cups chicken broth
1 cup whole milk or half-and-half
1 teaspoon salt (for filling)
1/2 teaspoon black pepper (for filling)
1/2 teaspoon dried thyme
2 cups all-purpose flour (for biscuits)
1 tablespoon baking powder
1/2 teaspoon salt (for biscuits)
6 tablespoons cold unsalted butter, cut into small cubes
3/4 cup whole milk or buttermilk
2 tablespoons fresh parsley, chopped, for garnish
Directions
- Preheat your oven to 400°F (200°C).
- Prepare the Filling: In a large, oven-safe skillet (like a cast iron skillet), melt 2 tablespoons of butter over medium heat. Whisk in 1/4 cup flour and cook for 1 minute, stirring constantly, to create a roux.
- Gradually whisk in the chicken broth, then the milk. Bring the mixture to a simmer, stirring, until the sauce thickens to your desired consistency. Season with 1 teaspoon salt, 1/2 teaspoon black pepper, and 1/2 teaspoon dried thyme.
- Stir in the diced cooked chicken, diced carrots, and frozen peas. Cook for 5-7 minutes, or until the carrots are tender and the filling is heated through and bubbling gently. Remove the skillet from the heat.
- Prepare the Biscuits (The Secret for Golden and Fluffy!): In a large bowl, whisk together 2 cups all-purpose flour, 1 tablespoon baking powder, and 1/2 teaspoon salt.
- Add the remaining 2 tablespoons cold butter cubes to the dry ingredients. Use a pastry blender, two forks, or your fingertips to cut the butter into the flour until the mixture resembles coarse crumbs with some pea-sized pieces of butter remaining. The cold butter is key for flakiness.
- Pour in 3/4 cup milk all at once. Mix with a fork until just combined and a shaggy dough forms. Be careful not to overmix; overmixing leads to tough biscuits.
- Turn the dough out onto a lightly floured surface. Gently knead 3-4 times, just enough to bring it together. Pat or roll the dough to about 1/2 inch thick.
- Use a 2-inch round cutter or a knife to cut out biscuits. You should get about 8-10 biscuits.
- Bake for Perfection: Carefully arrange the cut biscuits directly on top of the hot chicken filling in the skillet. Try to space them slightly so they have room to expand and brown evenly.
- Bake in the preheated 400°F (200°C) oven for 20-25 minutes, or until the biscuits are deep golden brown on top and cooked through. The hot filling generates steam which helps the biscuits rise beautifully, ensuring a fluffy interior, while the high oven temperature creates that irresistible golden crust. The residual heat from the skillet also cooks the biscuit bottoms, preventing any doughy centers.
- Let the skillet rest for a few minutes before serving to allow the filling to set slightly. Garnish with fresh chopped parsley.
Notes
- The secret for golden and fluffy biscuits involves using cold butter, gentle mixing, and baking directly on the hot filling.