I distinctly remember my early attempts at making tropical bliss balls, often ending up with a delicious but frustratingly crumbly mess. After countless kitchen experiments, I finally cracked the code to perfectly firm, delightful Tropical Pineapple Coconut Bliss Balls every single time.
This recipe transforms a common challenge into a guaranteed success, offering a vibrant, no-bake treat that’s easy to make and holds its shape beautifully.
Say Goodbye to Crumbly Mess: The Secret to Perfect Tropical Pineapple Coconut Bliss Balls
Tired of energy bites that fall apart? This recipe is specifically designed to overcome the common pitfall of soft, unmanageable bliss balls.
We’re not just aiming for taste; we’re guaranteeing a texture that’s both satisfyingly firm and delightfully chewy.
Why This Recipe Wins: Beyond Just Taste
This recipe excels not only in its bright, tropical flavor but also in its unparalleled consistency. Each bite offers a firm yet tender experience, a true testament to thoughtful ingredient selection and technique.
The no-bake nature makes it incredibly simple, perfect for quick snacks, portable treats, or last-minute dessert solutions.

The “Firmness Factor”: Our Promise to You
The secret to these perfectly firm and delightful Tropical Pineapple Coconut Bliss Balls lies in two critical steps. First, meticulous draining of the crushed pineapple removes excess moisture, a common culprit for crumbly results.
Second, adequate chilling time allows the mixture to firm up properly, ensuring effortless rolling without any falling apart. You’ll find these surprisingly easy to handle and enjoy.
Tropical Treasure Chest: Essential Ingredients for Your Bliss Balls
Crafting these delectable bites starts with understanding the role of each ingredient. Quality and preparation make all the difference.
Choose fresh, high-quality ingredients for the most vibrant flavor profile and optimal texture.
The Sweet Heart: Well-Drained Crushed Pineapple
The success of your Tropical Pineapple Coconut Bliss Balls hinges on the pineapple’s moisture content. Well-drained crushed pineapple is absolutely critical.
Excess liquid will prevent your balls from firming up, leading to that dreaded crumbly consistency. Squeeze out every drop possible.
Binding Brilliance: Sweetened Condensed Milk
Sweetened condensed milk serves as the primary binder, bringing all the ingredients together into a cohesive mass. Its rich sweetness also perfectly complements the tangy pineapple.
It provides the necessary stickiness and a creamy undertone that makes these treats so irresistible.
The Flaky Base: Desiccated Coconut (and its alternatives)
Desiccated coconut, finely shredded and dried, is the ideal choice for this recipe. Its drier texture readily absorbs moisture, contributing to the firm structure.
While other forms of coconut might be used in other dishes, desiccated offers the best performance here. Toasted coconut can add an extra layer of flavor and aroma.
A Hint of Warmth: Vanilla Extract
A touch of vanilla extract rounds out the tropical flavors, adding a subtle warmth and depth. It helps to enhance the overall sweetness and aroma without overpowering the main ingredients.
Optional Enhancements: Elevating Your Flavor Profile
To brighten the flavor, consider adding a pinch of finely grated lime zest to the mixture. This provides an aromatic, citrusy lift that complements the pineapple beautifully.
A tiny dash of ground ginger can introduce a subtle, warming spice, adding another layer of complexity to your bliss balls.
For an extra indulgent touch, a small pinch of sea salt can enhance the sweetness and balance the tropical notes. You might also consider a drizzle of melted white chocolate after chilling for a decorative finish.
Gather Your Gear: Essential Tools for No-Bake Bliss
One of the beauties of this recipe is its minimal equipment requirement. You likely already have everything you need in your kitchen.
Basic Kitchen Staples You’ll Need
-
Medium Mixing Bowl: Essential for combining your ingredients thoroughly and allowing for proper chilling.
-
Spoon or Spatula: For initial mixing, though clean hands work just as well and can often achieve a more uniform blend.
-
Measuring Cups and Spoons: For precise ingredient quantities, ensuring consistent results every time.
-
Fine-Mesh Sieve or Cheesecloth: Absolutely necessary for thoroughly draining the crushed pineapple. This cannot be skipped.
-
Plastic Wrap: To cover the mixture tightly during chilling, preventing it from drying out or absorbing refrigerator odors.
-
Shallow Dish: For easily coating your formed bliss balls in extra desiccated coconut.
Crafting Your Bliss: Step-by-Step Tropical Pineapple Coconut Bliss Balls Perfection
Follow these detailed steps to create perfectly firm and flavorful Tropical Pineapple Coconut Bliss Balls every time.
Each stage is important for achieving the ideal texture and taste.
-
Prepping Your Pineapple: The Draining Dance
Before you begin, ensure your crushed pineapple is exceptionally well-drained. This is the most crucial step to prevent a crumbly texture.
Press out as much liquid as possible using a fine-mesh sieve or cheesecloth for optimal results. You want it almost dry to the touch.
-
The Great Combine: Mixing Your Ingredients
In a medium bowl, combine the well-drained crushed pineapple, sweetened condensed milk, 2 cups of desiccated coconut, and vanilla extract.
Mix thoroughly with a spoon or your hands until a uniform and cohesive mixture forms. It should stick together well when pressed, indicating it’s ready for chilling.
-
The Chill Factor: Unlocking Firmness
Cover the bowl tightly with plastic wrap and refrigerate the mixture for at least 2 hours.
This chilling step is absolutely crucial for the balls to firm up properly, preventing them from being crumbly and making them easy to roll without falling apart. Don’t rush this stage.
-
Ready to Roll: Preparing the Mixture
Once the mixture is very firm and easy to handle, remove it from the refrigerator.
It should feel solid and pliable, not sticky or loose, a clear sign the chilling process was successful.
-
Forming the Spheres of Joy: Rolling Techniques
Take small portions of the mixture, about 1 tablespoon each, and roll them tightly between your palms into smooth, compact balls.
Aim for even sizes for uniform presentation and consistent texture. Firm, consistent pressure helps create perfectly round shapes.
-
The Final Flourish: Coconut Coating
Place the extra desiccated coconut in a shallow dish. Roll each formed ball in the coconut until it is evenly and completely coated.
This final coating adds visual appeal and another layer of delicious coconut flavor.
-
Set and Serve: Final Chill
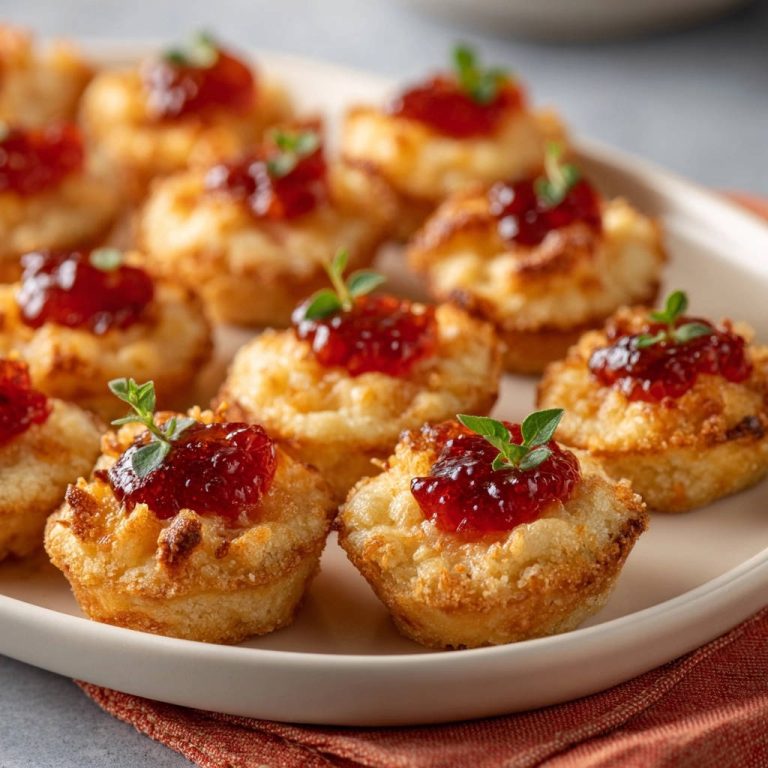
Arrange the finished Tropical Pineapple Coconut Bliss Balls on a plate or in an airtight container.
Refrigerate until ready to serve for the best texture and firmness. They are best enjoyed chilled, offering a refreshing burst of tropical flavor.
Bliss Ball Brilliance: Expert Tips for Success
These tips will elevate your Tropical Pineapple Coconut Bliss Balls from good to extraordinary, ensuring perfect results every time.
Pay attention to these small details for a noticeable difference in texture and flavor.
Mastering Pineapple Moisture: Drain Like a Pro
For ultimate firmness, don’t just drain the pineapple; squeeze it. Use a clean kitchen towel or several layers of cheesecloth to press out every last drop of juice.
This step truly makes the difference between a cohesive ball and a crumbly mess.
The Power of the Chill: Don’t Skip This Step!
The 2-hour chilling period is non-negotiable. It allows the sweetened condensed milk to solidify and the coconut to fully absorb moisture.
A well-chilled mixture is firm, easy to roll, and less likely to stick to your hands. If time allows, chill for 4 hours or even overnight.
Achieving Uniform Balls: Rolling Consistency
For consistent size and shape, use a small cookie scoop or a measuring spoon to portion out the mixture. This ensures all your bliss balls are uniform.
When rolling, apply firm, even pressure with your palms. This compacts the mixture and creates a smooth, round sphere.
Coating Secrets: Getting That Perfect Finish
To get a beautiful, even coating of coconut, gently roll each ball in the desiccated coconut in a shallow dish. Press lightly to ensure adherence.
If the coconut isn’t sticking well, your balls might not be firm enough, or your hands might be too warm. Pop them back into the fridge for a few minutes.
Flavor Variations to Explore
Introduce a tropical zest by adding a teaspoon of fresh lime or orange zest to the mixture, enhancing the fruitiness.
For a richer flavor, consider briefly toasting half of the desiccated coconut before mixing, adding a nutty depth. This complements the pineapple beautifully.
A touch of finely grated fresh ginger can also add a delightful warmth and subtle spice, creating a more complex flavor profile. For another tropical delight, you might also enjoy our creamy tropical rice pudding.
Troubleshooting Your Tropical Pineapple Coconut Bliss Balls: Solutions for Common Issues
Even with expert guidance, questions arise. Here are solutions to common challenges you might encounter.
Problem: My Bliss Balls are Crumbly and Won’t Hold Together
This is almost always due to insufficient pineapple draining. The mixture has too much moisture. The solution is to return the mixture to the bowl, add a tablespoon or two more of desiccated coconut to absorb excess liquid, and mix well.
Then, re-chill for at least an hour. Ensure your initial draining process is thorough-it’s truly the most critical step.
Problem: The Mixture is Too Sticky (or Too Dry!)
If the mixture is too sticky, add a tablespoon of desiccated coconut at a time, mixing until it reaches a manageable consistency. Chill again for 30 minutes.
If it’s too dry, it means too much liquid was removed, or your pineapple was naturally drier. Add a teaspoon of sweetened condensed milk, mix well, and re-chill as needed.
Problem: My Balls Aren’t Perfectly Round or Smooth
This can happen if the mixture isn’t cold enough or if you’re not applying enough pressure when rolling. Ensure the mixture is very firm from chilling.
Use consistent, firm pressure as you roll the portions between your palms. Work quickly, and if your hands get warm, wash them with cold water or briefly chill the mixture again.
Your Tropical Bliss Balls Questions Answered
Curious about substitutions, storage, or dietary considerations? We’ve got you covered.
Can I Use Fresh Pineapple Instead of Canned?
While fresh pineapple offers vibrant flavor, it contains significantly more moisture than canned. If you use fresh, you’ll need to finely chop it and then drain it extremely well, potentially pressing it through a fine-mesh sieve or nut milk bag for a longer period.
The high moisture content of fresh pineapple makes it much harder to achieve the desired firm, non-crumbly texture without significant effort.
How Long Do Tropical Pineapple Coconut Bliss Balls Last?
When stored in an airtight container in the refrigerator, these Tropical Pineapple Coconut Bliss Balls will stay fresh and delicious for up to 7-10 days.
Their flavor often deepens slightly over the first day as the ingredients meld together.
Can I Freeze These Bliss Balls?
Yes, these bliss balls freeze beautifully! Place them in a single layer on a parchment-lined baking sheet and freeze until firm (about 1-2 hours).
Once frozen, transfer them to an airtight freezer-safe container or bag for up to 2-3 months. Thaw them in the refrigerator for a few hours before serving.
Are There Any Substitutions for Sweetened Condensed Milk?
Sweetened condensed milk is key for both binding and sweetness in this recipe. While some vegan alternatives like coconut condensed milk exist, they may alter the final texture and sweetness level.
For a dairy-free option, ensure you use a sweetened condensed coconut milk and note that the texture might be slightly softer. Adjust coconut levels if needed to maintain firmness.
Is This Recipe Gluten-Free or Dairy-Free?
This recipe is inherently gluten-free, as all listed ingredients are naturally gluten-free. It’s a fantastic option for those with gluten sensitivities.
However, it is not dairy-free due to the use of traditional sweetened condensed milk, which contains dairy. For a dairy-free version, you would need to use a dairy-free sweetened condensed milk alternative.
Serving & Storage: Keeping Your Bliss Balls Fresh and Delicious
These Tropical Pineapple Coconut Bliss Balls are incredibly versatile, perfect for various occasions and easy to store.
The Best Ways to Serve Your Tropical Pineapple Coconut Bliss Balls
Serve them chilled as a refreshing post-meal treat or a delightful snack any time of day. They are excellent alongside a cup of coffee or a light herbal tea.
These vibrant bites also make a fantastic addition to dessert platters for parties, potlucks, or family gatherings, offering a taste of the tropics.
Storing for Freshness: Fridge & Freezer Tips
Always store your Tropical Pineapple Coconut Bliss Balls in an airtight container in the refrigerator. This maintains their firm texture and prolongs their freshness.
If storing for more than a week, consider freezing them as outlined in the FAQ section, ensuring you always have a delightful treat on hand.
Make-Ahead Magic: Prepare for Parties with Ease
These bliss balls are ideal for make-ahead preparations. You can prepare the mixture, chill it, and roll the balls a day or two in advance of an event.
For longer planning, they can be frozen as described, allowing you to simply thaw and serve when needed, making party prep a breeze.
Share Your Tropical Pineapple Coconut Bliss Balls Masterpiece!
You’ve now mastered the art of creating perfectly firm and irresistibly delicious Tropical Pineapple Coconut Bliss Balls. We hope this recipe brings a little sunshine to your day and becomes a treasured staple in your kitchen.
Don’t keep this tropical delight to yourself! We’d love to see your creations. Share your photos and experiences in the comments below or tag us on social media.
Looking for more no-bake treats? Explore our collection of easy no-bake energy bites to keep the bliss going!

Tropical Pineapple Coconut Bliss Balls
Course: SnacksCuisine: International CuisineDifficulty: easy4
about 20 balls20
minutes120
minutesInternational Cuisine
Ingredients
1 cup well-drained crushed pineapple
1/2 cup sweetened condensed milk
2 cups desiccated coconut, plus more for rolling
1/2 teaspoon vanilla extract
Directions
- In a medium bowl, combine the well-drained crushed pineapple, sweetened condensed milk, 2 cups of desiccated coconut, and vanilla extract. It is very important to press out as much liquid as possible from the crushed pineapple before adding it to the mixture, as excess moisture can lead to a crumbly consistency.
- Mix thoroughly with a spoon or your hands until a uniform and cohesive mixture forms. It should stick together well when pressed.
- Cover the bowl tightly with plastic wrap and refrigerate the mixture for at least 2 hours. This chilling step is absolutely crucial for the balls to firm up properly, preventing them from being crumbly and making them easy to roll without falling apart.
- Once the mixture is very firm and easy to handle, remove it from the refrigerator.
- Take small portions of the mixture, about 1 tablespoon each, and roll them tightly between your palms into smooth, compact balls.
- Place the extra desiccated coconut in a shallow dish. Roll each formed ball in the coconut until it is evenly and completely coated.
- Arrange the finished pineapple coconut bliss balls on a plate or in an airtight container. Refrigerate until ready to serve for the best texture and firmness.
Notes
- Ensure pineapple is well-drained and chill mixture for at least 2 hours for best texture and firmness.